
My living room had nice furniture and decent lighting but it still felt like a waiting room. Took me embarrassingly long to figure out it was missing texture and a place to drop the day. Building an entry bench fixed more than storage. It gave the apartment a place to land.
These ideas skew modern farmhouse with some minimalist and coastal picks mixed in. Most projects use 3/4-inch plywood and cost under $150 in materials. They work in entryways, mudrooms, small apartments, or at the end of a hallway.
Transitional Lift-Top Bench for Small Entries
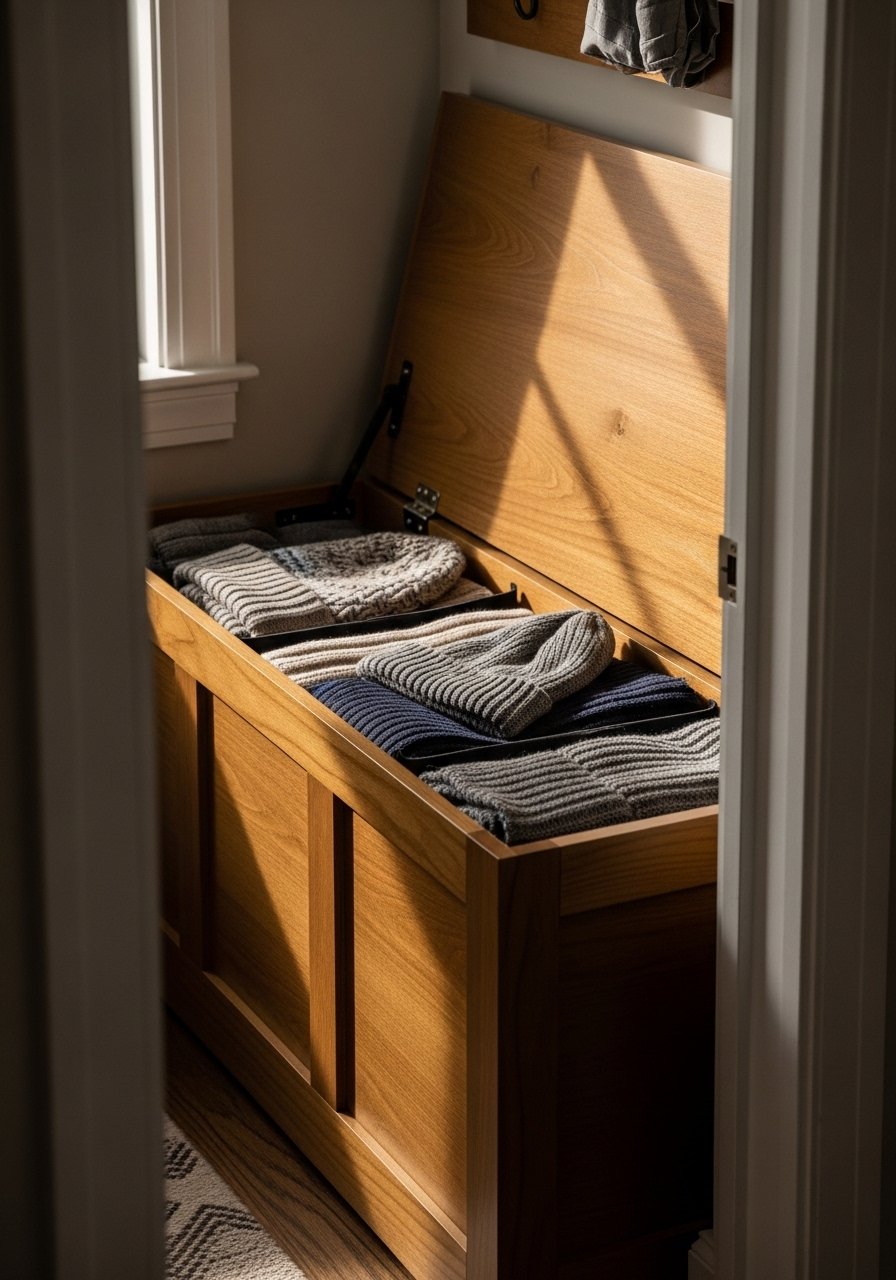
This is the bench I built when winter gear started living on my floor. A lift-top hides bulky items and makes the entry feel tidy. Build the box with 3/4-inch plywood and fit a soft-close hinge so the lid never slams shut. I use an 18-inch seat height so sitting to tie shoes feels natural. Most builds use a 1-inch overhang on the front to hide the frame edges, and that little detail makes it look custom. Common mistake is skipping pilot holes near corners and then the wood splits. Drill pilot holes every time. For hardware I like these soft-close hinges from Amazon for under $25. Folks usually spend $40 to $80 per square foot on these builds, so plan your plywood cuts first.
Modern Farmhouse Open Cubbies for Shoes
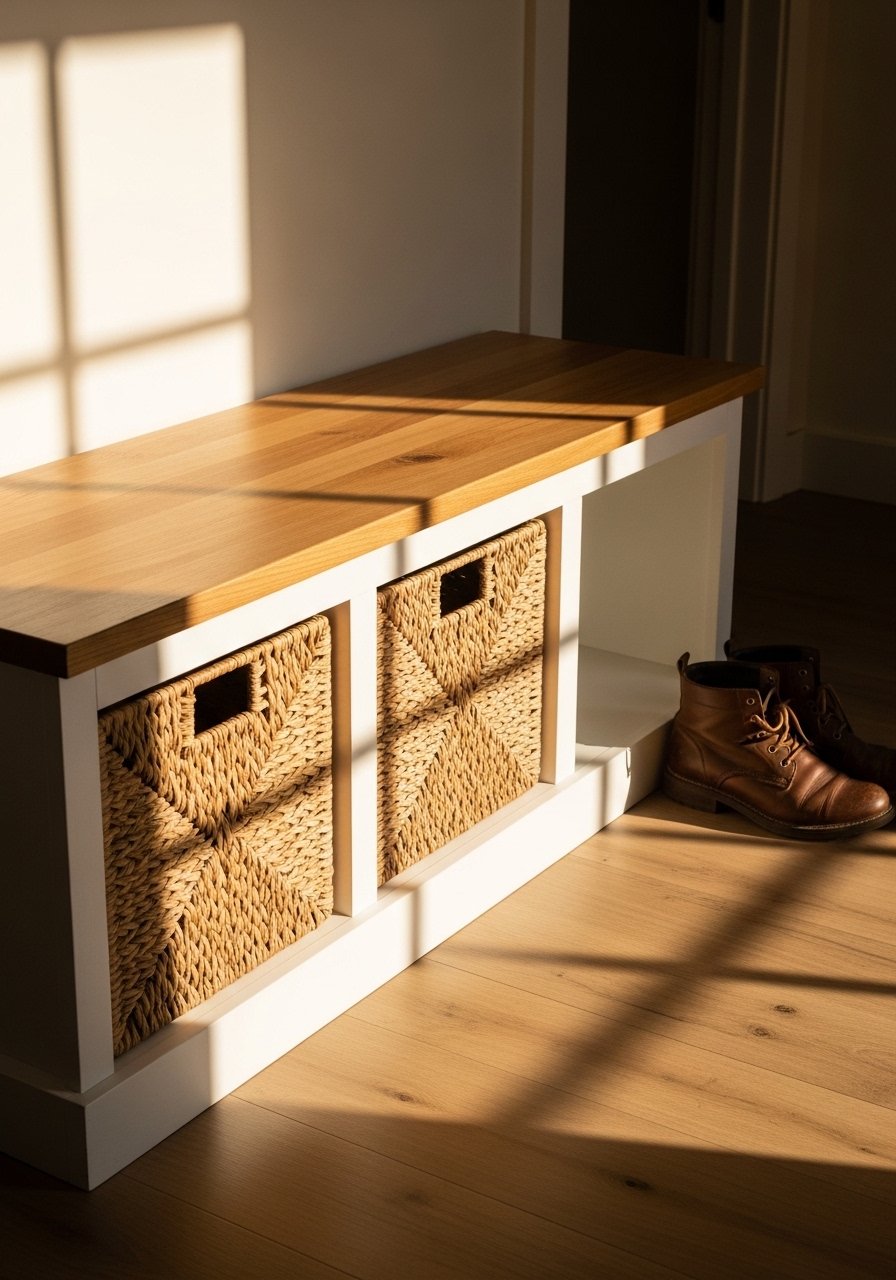
Cubbies stay the go-to for shoe chaos, and an open-front cubby bench is the simplest fix. Make each cubby about 12 inches wide and 12 to 16 inches deep so two adult shoes fit side by side. Use 1×3 trim on the face for a finished look and leave the top as a stain-grade oak plank. A mistake I see often is making cubbies too shallow so boots overhang and scuff the paint. Counter that by adding a 2×4 under the top for support if the bench will see heavy use. I bought a set of woven baskets from this Amazon collection of storage baskets to hide kids’ gear. If you live in a rental, skip nailing the face trim and use brad nails only.
Scandinavian Three-Bay Bench for Family Homes
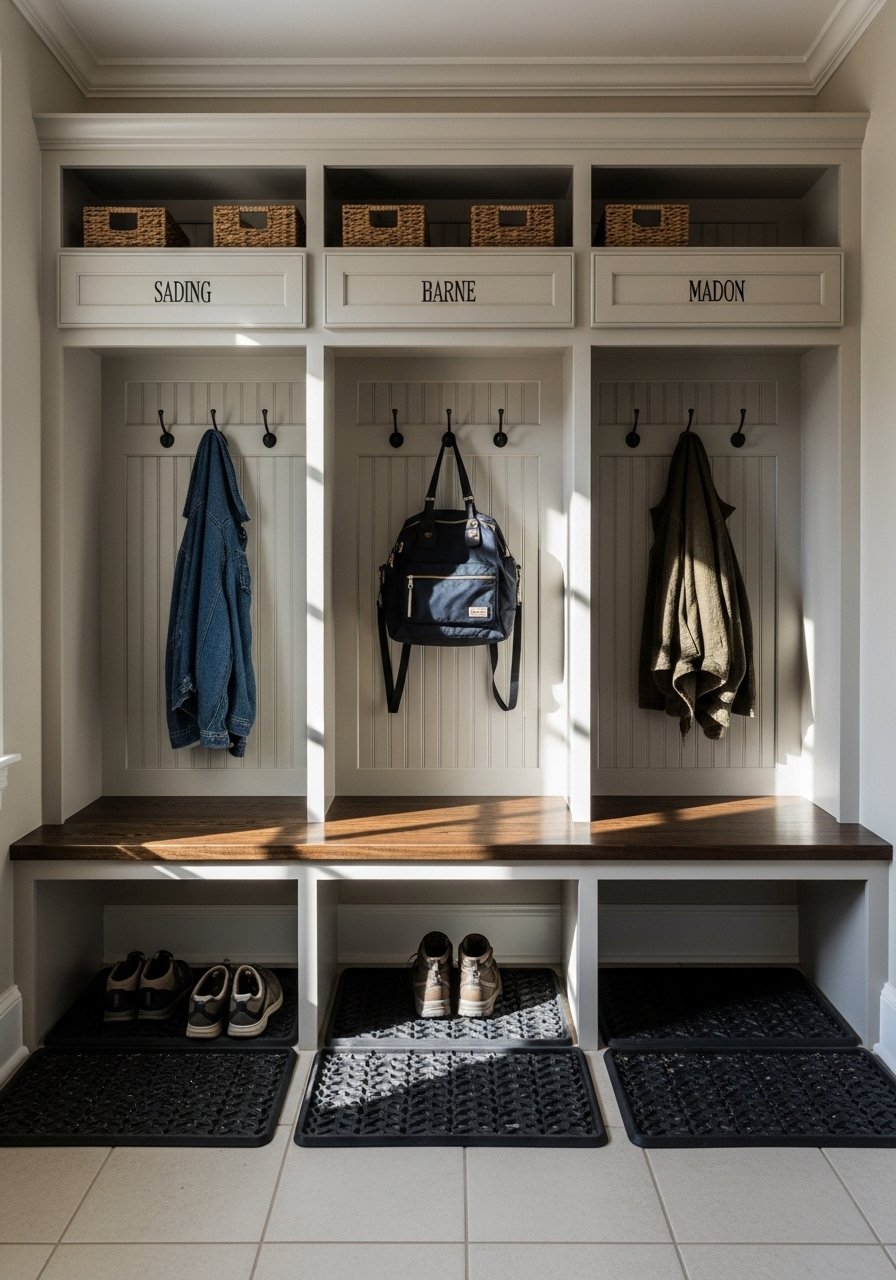
Splitting the bench into three bays keeps chaos sorted by person. I added a simple label strip above each cubby and suddenly morning routines improved. Use a 12-inch minimum width per bay and pocket screws every 24 inches on the frame. A mistake people make is building a long top without internal supports, and then the seat sags. Add 2×4 support squares every 24 inches to stop sagging. For a clean painted finish, hide pocket holes with plugs and sand smooth. I used a Kreg Jig when I made mine and recommend this Kreg jig kit on Amazon for beginners. Cross-reference the lift-top idea above if you want hidden storage in one bay.
Minimalist Pocket-Hole Bench for Renters
If you rent, you still want a bench that reads built-in. Build a freestanding box using pocket holes and plug them so the finish looks professional. Pocket holes hide the screws and a plugged finish avoids visible clutter on the face. Use 3/4-inch plywood for the frame and keep the whole unit under 4 feet wide so it fits hallway nooks. A frequent error is screwing near edges without pilot holes. Drill pilot holes and countersink screws to avoid splitting. I bought a set of pocket-hole plugs from this kit I found online. For shoes that change sizes, add adjustable shelf pins to one bay for flexibility.
Built-In Wall-Framed Bench for Narrow Halls
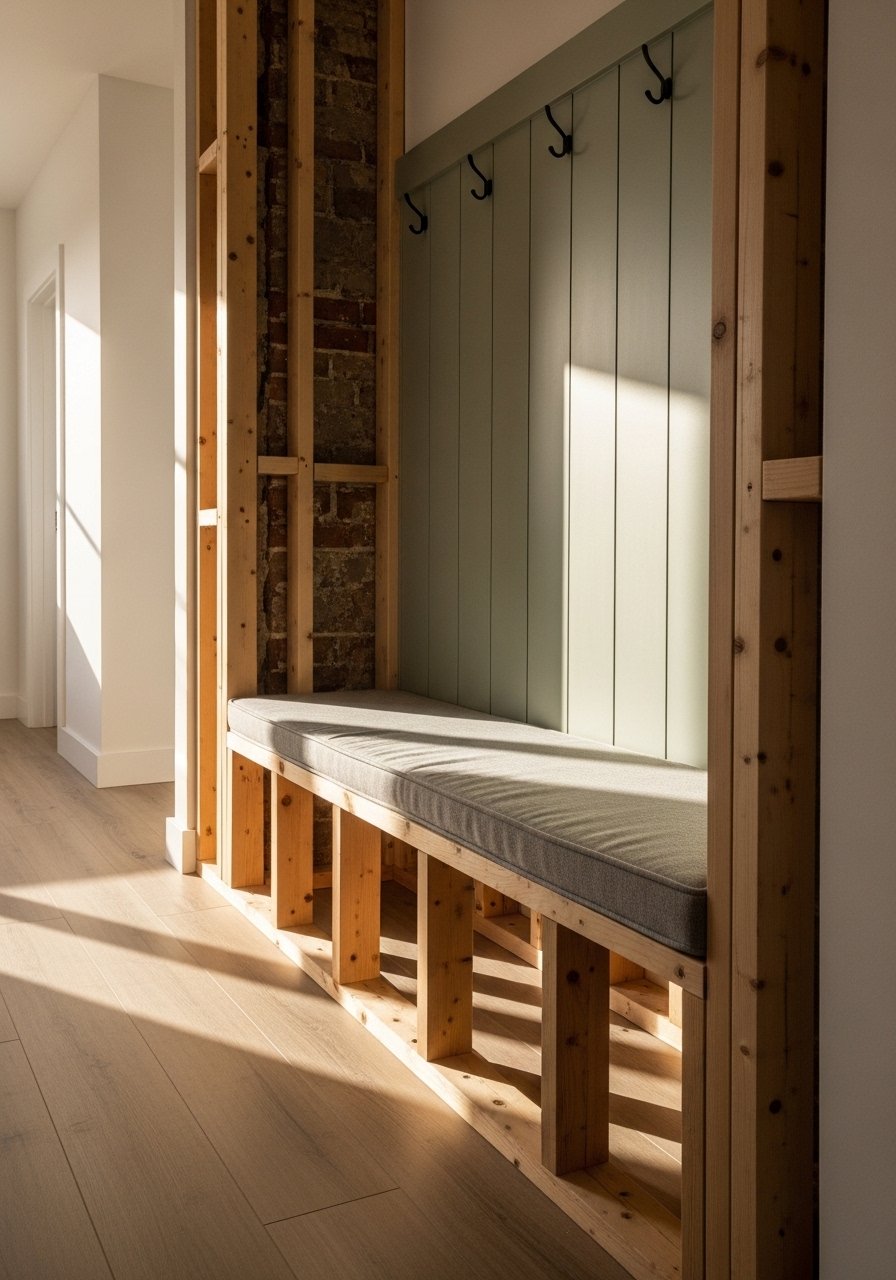
Framing a bench into studs makes it feel like it has always lived there. Use 2×4 framing every 24 inches and attach a 1/4-inch back panel for rigidity. Square the frame with a carpenter’s square at every corner so doors and lids line up later. One mistake is failing to check 90 degrees during assembly and then lids bind. I also add a 1-inch seat overhang to hide raw edges and give a built-in look. For a renter-friendly version, make a freestanding base that you can anchor with removable brackets. For the top I prefer a solid alder plank and grabbed this stain-grade alder board for the finish look.
Coastal Trimmed Bench with Cove Molding Detail

Adding cove molding instantly upgrades plywood and keeps the cost down. I added 4-inch MDF baseboards and a small cove trim to mimic a furniture piece. The visual payoff is huge for about $10 in molding. People often slap paint on plywood and expect it to look custom. The extra trim hides seams and gives a clean shadow line. Use brad nails and wood filler on the nail holes for a smooth finish. I picked up a pack of cove molding from this molding set on Amazon. Note that nail heads will show over time on heavy-use benches, so check them after a month for touch-up paint.
Mudroom Closed Storage Bench for Heavy Use
If you want to hide winter gear, closed doors keep the space calm. Build boxy storage with full overlay doors and soft-close hinges so kids cannot slam fingers. A common mistake is using cheap hinges that fail fast, and then you are rehanging doors a year later. Invest in a good set of soft-close hinges. Add a 1/4-inch back panel and 2×4 internal supports for heavy loads. I use these soft-close cabinet hinges I trust. Budget runs a bit higher for doors, expect $100 to $150 for a mid-size build, but the payback is weeks saved on morning cleanups.
Adjustable Shelf Bench for Growing Kids
Kids grow out of shoes fast. An adjustable shelf bench gives you flexibility. Drill 3/8-inch holes every 1.5 inches on the inside face with a shelf pin jig and you can move shelves as sizes change. A mistake is placing shelf holes too far back so shoes stick out. Keep the pinch point at 12 to 16 inches depth. I used a simple shelf-pin kit I ordered here shelf-pin-jig-and-pins to speed the job. This bench idea pairs well with the three-bay setup if you want one bay for each child.
Long Industrial Bench with Extra Support
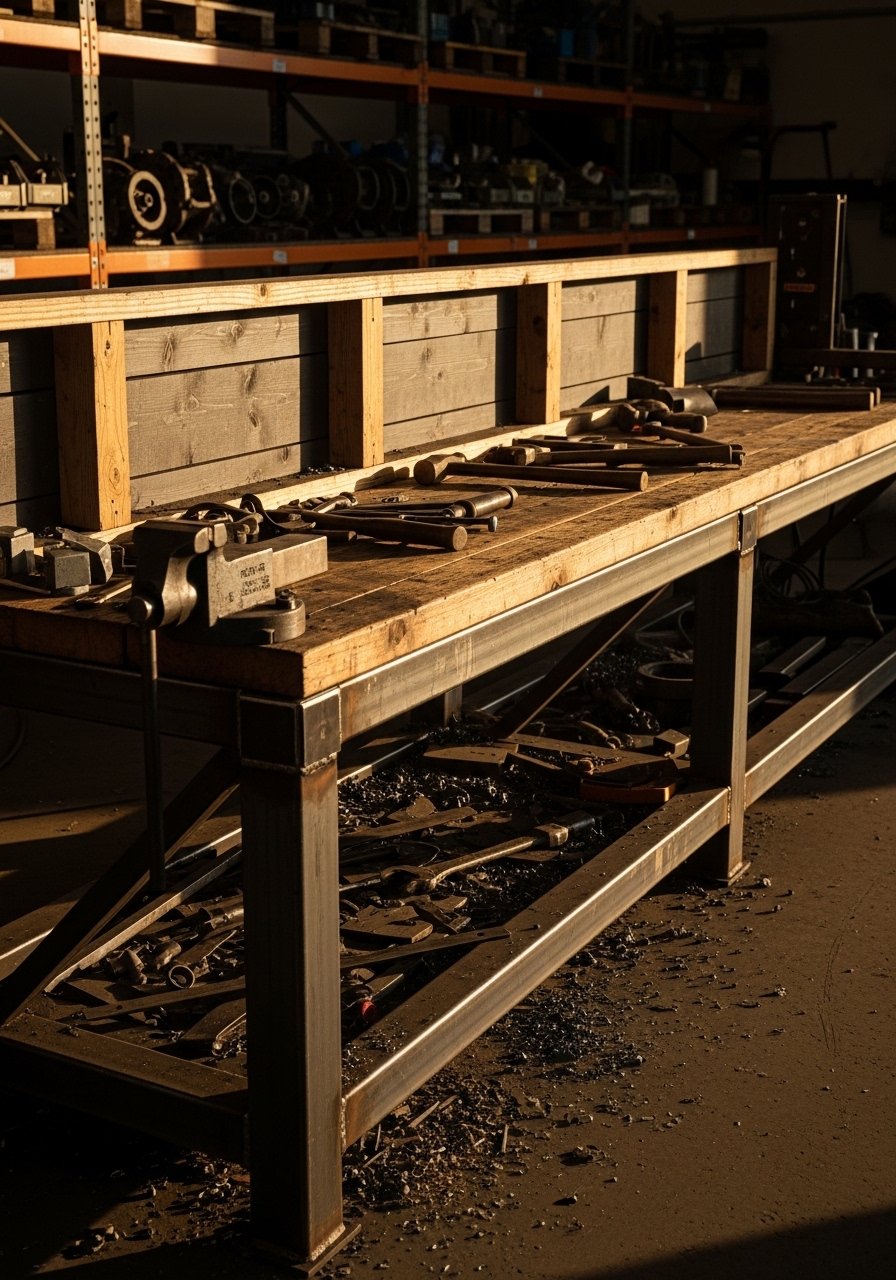
Long benches look great until they sag. The trick is extra internal support. For spans over 4 feet, add 2×4 support squares every 24 inches inside the frame. I also recommend a 3/4-inch plywood top or a solid wood plank to prevent flex. People often skip internal supports to save time and then regret it. Measure twice and add the extra blocks. Use a carpenter’s square to keep everything at 90 degrees so the top lines up. I used these heavy-duty wood screws for secure joins. This bench handles heavy gear and a chorus of teens all sitting at once.
Stain-Grade Solid Wood Top for Durability
Plywood tops chip, and after a month the edges show wear. A stain-grade solid wood top lasts longer and looks intentional. I ripped an alder board to size and finished it with a hard-wax oil for heavy use. For daily sitting keep the seat at 18 inches high and the top overhang at 1 inch. A common slip is skipping final sanding between coats, which leaves the surface rough. Sand progressively from 120 to 220 grit and then apply two coats of finish. I used this hard-wax oil on Amazon for a durable finish. If you have pets, choose a scratch-resistant top and keep bowls away from the bench edge.
Your Decor Shopping List
- Honest pick for cushion foam: High density seat foam 18-inch. Fits most bench tops, under $30. Use medium firm for daily sitting.
- Hardware essentials: Soft-close hinges set. Spend a bit here for safety and longevity.
- Joinery help: Kreg jig kit. Makes pocket holes easy if you are new to it.
- Finish top: Alder wood board unstained. Great for stain-grade tops, available in several widths.
- Storage baskets: Woven storage baskets set in two sizes, budget friendly, similar at Target.
- Trim and molding: Cove molding set. Use to hide plywood edges and add detail.
- Shelf hardware: Shelf-pin-jig-and-pins. For adjustable cubbies, under $20.
- Fasteners: Heavy-duty wood screws. Grab a mixed box for all the frame connections.
Shopping Tips
White oak beats dark wood in 2026. White oak floating shelves look current, not dated.
Grab these velvet pillow covers for $12 each. Swap them seasonally and the bench vignette feels refreshed.
Curtains should puddle or kiss the floor, never hang halfway up. These 96-inch linen panels are right for standard 9-foot ceilings.
One large plant beats five small ones. A faux fiddle leaf fig 6ft adds height without maintenance.
Frequently Asked Questions
Q: What height should an entryway bench be for comfort?
A: Aim for 18 inches high. It makes sitting to tie shoes comfortable and matches standard chair heights. I use that measurement on every bench I build.
Q: How wide should cubbies be for adult shoes?
A: Make cubbies at least 12 inches wide and 12 to 16 inches deep. That fits most adult shoes side by side and keeps boots from overhanging.
Q: Can I build a bench without attaching it to the wall in a rental?
A: Yes. Build a freestanding box with pocket-hole joinery and keep it under 4 feet wide if your space is small. Use removable brackets or rubber feet to prevent sliding.
Q: My bench top slams when I close it. How do I fix that?
A: Install soft-close hinges. They stop slamming and protect little fingers. I use a soft-close hinge set for under $25 and replace cheap hinges as they wear quickly.
Q: How much should I budget for a DIY entryway bench with storage?
A: Expect to spend around $40 to $80 per square foot using plywood and standard hardware. A simple cubby bench can be under $100 while stain-grade tops and doors push the price higher.
