
My living room had nice furniture and decent lighting but it still felt like a waiting room. Took me embarrassingly long to figure out it was missing texture. Once I added shallow floating shelves at staggered heights the room finally had places for plants, a few favorite books, and things that actually made it feel lived in.
These builds lean modern farmhouse and transitional with a few industrial touches. Most projects land between $30 and $150, with a few splurges for live edge or walnut. They work in kitchens, entryways, bathrooms, nurseries, and small apartments where floor space is precious.
Minimalist Pine Ledges for the Kitchen

A simple set of 1×4 pine boards cut to 36 inches saved my sad spice shelf moment. These fake built-ins because they sit low and continuous across the wall, making the kitchen feel custom without demo. Use 3/4-inch boards, 10 inches deep max, and space shelves 12 inches apart so jars sit without toppling. I stained mine with Minwax Provincial Wood Finish and mounted them with a French cleat I picked up as a set on Amazon. A common mistake is using thin boards that bow under jars. Most folks mess up their first shelf try.
Staggered Black Metal Shelves in the Living Room

If your wall reads flat, stagger heights instead of perfectly even spacing. I used matte black metal brackets under 3/4-inch oak for an industrial-meets-modern look. Oak boards around 36 inches hold about 20 pounds safely when mounted into studs with 1.5-inch screws. I leaned a small framed print on the top shelf and stacked three books on their side on the middle one to follow the rule of thirds. People drop about $85 to outfit three shelves, so this is an affordable upgrade that reads intentional. Avoid tiny brackets that sit too small behind the board.
Whitewashed Desk Nook Shelves for a Home Office

I whitewashed plain pine and hung two slim ledges above my desk. The whitewash keeps streaks from showing and reads fresher than raw pine for a light-filled nook. Use 12-inch depth boards if you want to store notebooks and a cup of pens. For renter tests, lay out the shelves with Command strips first to check balance. Grab whitewash wood stain for the finish. A mistake is hanging them too high above the desk. Keep the bottom shelf 12 to 15 inches above the workspace so the top shelf does not become unreachable.
Live Edge Walnut Shelf for an Entryway Gallery

A single live edge walnut shelf made my entryway stop being a drop zone and start feeling like an intentional gallery. Walnut is heavier, so I used a hidden French cleat and 1.5-inch screws into studs. A 36-inch slab looks great with a 2-inch overhang on each end. If you want a splurge, search for small walnut slabs and seal with a clear finish. I used walnut-slab-finish-oil for a low-sheen look. The common fail is underestimating weight and using toggles only. This needs studs.
Reclaimed Barnwood Bathroom Shelves for Towels

Bathroom humidity will wreck untreated wood, so reclaimed barnwood needs a good sealer. I grabbed thinner reclaimed boards and finished them with a moisture-proof clear coat to keep the rustic look without warping. Keep shelf depth to 10 inches so towels stack without touching faucets. For mounting in tile areas, use a template and drill with the right bit to avoid cracked tile. Try waterproof-clear-coat for a durable finish. A mistake is assuming any reclaimed board is straight. Pick pieces with minimal warp or plane them flat first.
Floating Nightstands Beside the Bed

I cut two 1×6 poplar boards to act as floating nightstands and installed them at mattress height. They save floor space for a rug and make cleaning under the bed easier. Keep the depth around 10 inches so lamps and a book fit. Use drywall anchors if studs miss your desired spot, but studs are better. For a clean finish look for no-visible-bracket-hangers. A frequent error is placing them too low. Measure twice and test with books before screwing in.
Kitchen Backsplash Ledges for Mason Jars

Shallow backsplash ledges are my trick for corralling spices and herbs without covering the tile. Keep boards 36 inches long if your counter run is standard and 10 inches deep so jars sit with room. Use heavy-duty cleats if you plan to load them with glass. Avoid placing screws through tile without a tiled drill bit and tape for a clean hole. I used heavy-duty-cleat-bracket hardware when I mounted mine. A photo-vs-reality note: jars look smaller on shelves than in photos, so plan spacing accordingly.
Pantry Dry Goods Shelves for Organized Jars

Turning a messy pantry into a neat one is mostly about shelf depth and spacing. I used 3/4-inch plywood cut to 12-inch depth and spaced shelves 12 to 15 inches apart so cereal boxes and jars fit upright. Label front-facing bins so everything is reachable. For strength, run a French cleat across the entire back wall attached to studs. Try clear-storage-jars-set for uniformity. A common issue is sagging over time, so keep shelves under a 15 to 25 pound limit if only using anchors.
Mudroom Key Drop Ledges with Hooks

A narrow cedar ledge with hooks underneath saved my entry clutter. I let the ledge hang 2 inches past the hooks so bags do not bump the wall. Cedar holds up to damp coats and smells nice. Use 1×4 cedar and finish lightly so it ages well. Attach with screws into studs or heavy-duty toggles if necessary. I added matte-black-hooks-set for contrast. Mistakes include placing hooks too low for adult coats. Test with the coat you use most.
Bookcase Wall Above the TV Console
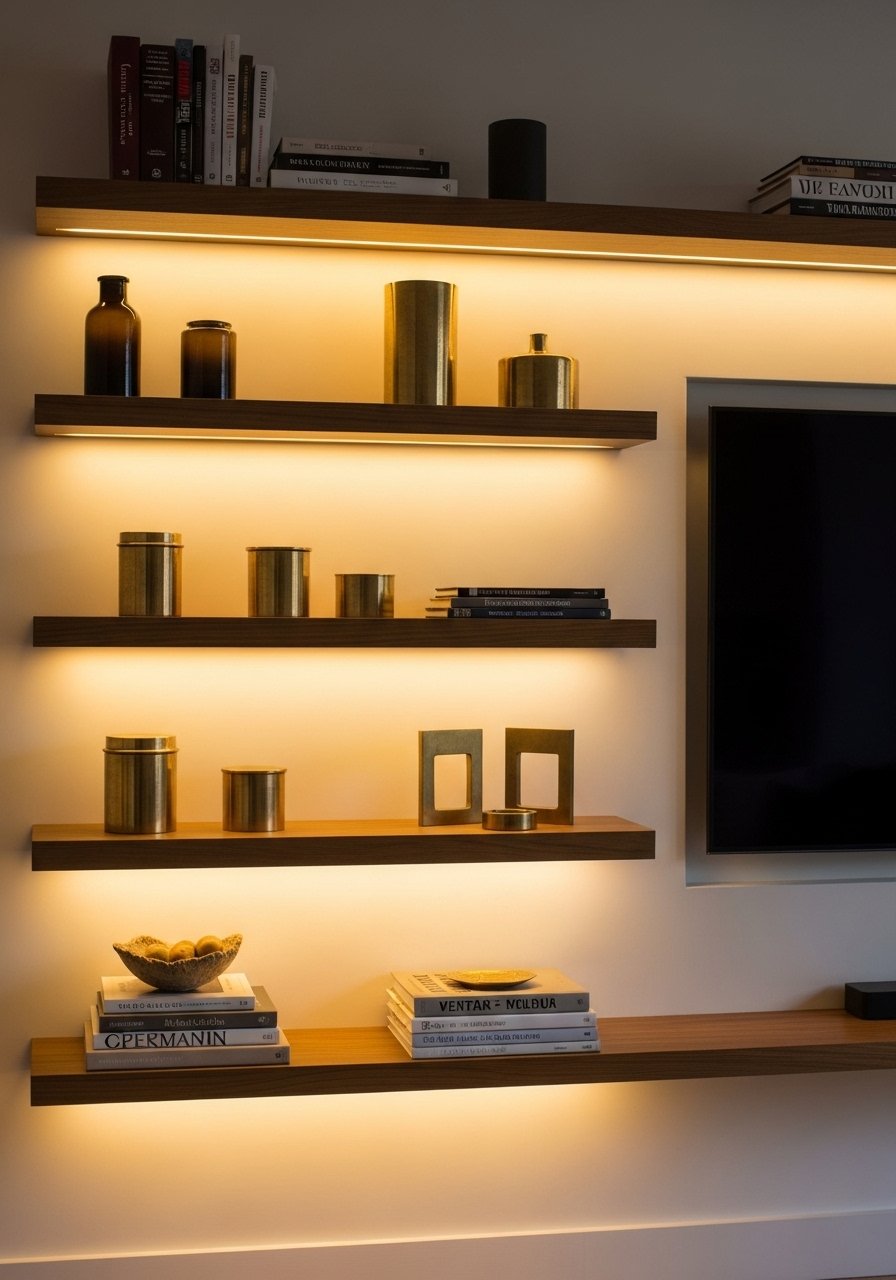
Framing a TV with floating shelves makes the screen feel anchored without cabinets. Use 3/4-inch boards and hidden cleats into studs. I staggered shelf heights by 2 to 4 inches to create air while allowing tall books. Follow the rule of thirds for object placement and use odd numbers of decor pieces. I used brass-picture-ledges to prop art rather than nailing frames. A frequent mistake is placing shelves too low so the TV blocks them. Mock this layout with paper templates first.
Laundry Folding Station Shelves

I built a long, shallow shelf above my washer for folding and basket storage. Depth around 12 inches gives room for a folded stack and a laundry basket lip. MDF or pine painted semi-gloss works because it resists humidity in laundry rooms. For a cleaner look, use hidden cleats and a 3/4-inch top. I placed woven-laundry-baskets-set on the top ledge. A common fail is forgetting clearance for dryer vents. Measure dryer height and lid clearance before you screw anything in.
Patio Plant Ledges That Can Weather It

Outdoor shelves need weatherproof wood like cedar and exterior-grade screws. I mounted cedar boards with exterior screws and spaced them 14 inches apart for medium pots. Use planters with saucers to avoid water staining the wood. For faster installs on balcony railings, use clamp-style brackets rather than drilling into brick. I grabbed cedar-outdoor-shelf-boards for the look and durability. Mistake to avoid is neglecting drainage. Pots without saucers will rot boards over time.
Nursery Low Toy Display Shelves for Safe Play

Putting shelves low keeps toys off the floor without encouraging climbing. I installed 12-inch deep birch plywood ledges set 12 inches apart at toddler height and sanded all edges to a soft radius for safety. Use non-toxic finish and round the corners for kids. For display, keep one shelf per 2.5 feet of wall so toddlers can reach favorites. I recommend non-toxic-wood-finish. A gap most miss is leaving the front edge sharp. Round it and your kid will not stub toes.
Corner Floating Shelves for Small Spaces

Corners are wasted opportunities in tiny apartments. I cut triangular shelves to fit snug into a 90-degree corner and mounted a French cleat across the rear studs for strength. Keep depth 8 to 10 inches so the corner does not jut into the walkway. Command strips are great to test layout before permanent install. Over 7 in 10 go for no-visible-hardware looks, so hidden cleats are worth the extra effort. A detail many articles skip is trimming the inner corner by 1/8 inch if your walls are slightly out of square.
Pet-Proof Rounded Shelves for Family Homes

If you have pets, rounded shelf edges and wipeable finishes are lifesavers. I routed a soft 1/4-inch round over the front edge and used a durable clear satin finish so fur and dirt wipe away. Mount lower shelves at a height where curious paws cannot reach breakables, and reserve top rows for plants. Use rounded-shelf-edge-sandpaper-set for the finish work. A missed tip is to test plants for toxicity before placing them on reachable shelves.
Your Decor Shopping List
- Honestly the best small investment. Brass picture ledges in two sizes for leaning prints
- For the kitchen pine ledges: 1×4 pine boards, 36-inch pre-cut (~$8 each). Also available at local hardware stores
- For finishes: Minwax Provincial Wood Finish for warm staining
- For hidden brackets: French cleat shelf mounting kit, rated for studs
- Hooks and hardware: matte black hooks set for mudroom ledges
- Nursery safe: non-toxic wood finish for kid-safe surfaces
- Outdoor option: cedar outdoor shelf board pack treated for weather
- Small storage: clear storage jars set for pantry uniformity
- Baskets: woven laundry baskets set for sorting in laundry and mudroom
- Tools to test layout: Command picture hanging strips large for renter-friendly mockups
Shopping Tips
Grab these white oak floating shelves if you want an updated look. White oak beats dark wood in 2026. Design feeds have shifted completely.
Buy these 96-inch linen panels for the curtain trick near shelves. Curtains should puddle or kiss the floor, never hang halfway up. These panels are right for standard 9-foot ceilings.
Lead with the tool. A small laser level saves hours and makes crooked shelves rare. Test one shelf first using Command strips before drilling your final holes.
Grab hidden shelf cleat kits when you plan to load shelves. Most hardware kits give the 1.5-inch screws you need for stud anchoring.
If you have pets, get clear wipeable finish and a small palm router for rounding edges. Pet-proof rounded edges and wipeable finishes are the details most guides skip.
Frequently Asked Questions
Q: How do I stop shelves from sagging in the middle?
A: Use 3/4-inch boards and mount into studs every 16 inches with a continuous French cleat. If studs miss your span, add a center support or shorter spans. A thicker front edge or plywood with edge banding cuts visual sag.
Q: Can I install floating shelves in a rental?
A: Yes, but test the layout first with Command strips to confirm balance and spacing. For permanent looks ask your landlord about using toggles or small anchor screws. Most renters start with strips to avoid holes then commit once the layout works.
Q: What depth and spacing should I use for general shelves?
A: Keep depth under 10 inches for everyday styling and 12 inches max for pantry or laundry. Space shelves 12 to 15 inches apart for books and jars. These numbers stopped me from making one too-high shelf that I never used.
Q: How do I install shelves on tile without cracking it?
A: Use painter's tape over the drill spot and a carbide or masonry bit sized for your anchor. Drill slowly and back off if you see cracks. Practice on scrap tile first to build confidence.
Q: Should I use visible brackets or hidden cleats?
A: Hidden cleats are how most people go for a clean look. Over 7 in 10 go for no-visible-hardware looks. Visible brackets suit industrial or rustic styles, but cleats keep the shelf silhouette thin and modern.
Q: Any tips for family-safe shelving with kids and pets?
A: Mount lower shelves low enough for kids to reach toys safely, and round all shelf edges. Use non-toxic finishes for nurseries and keep breakables on higher shelves. Family versions with lower kid-height shelves are a detail many articles miss.
