
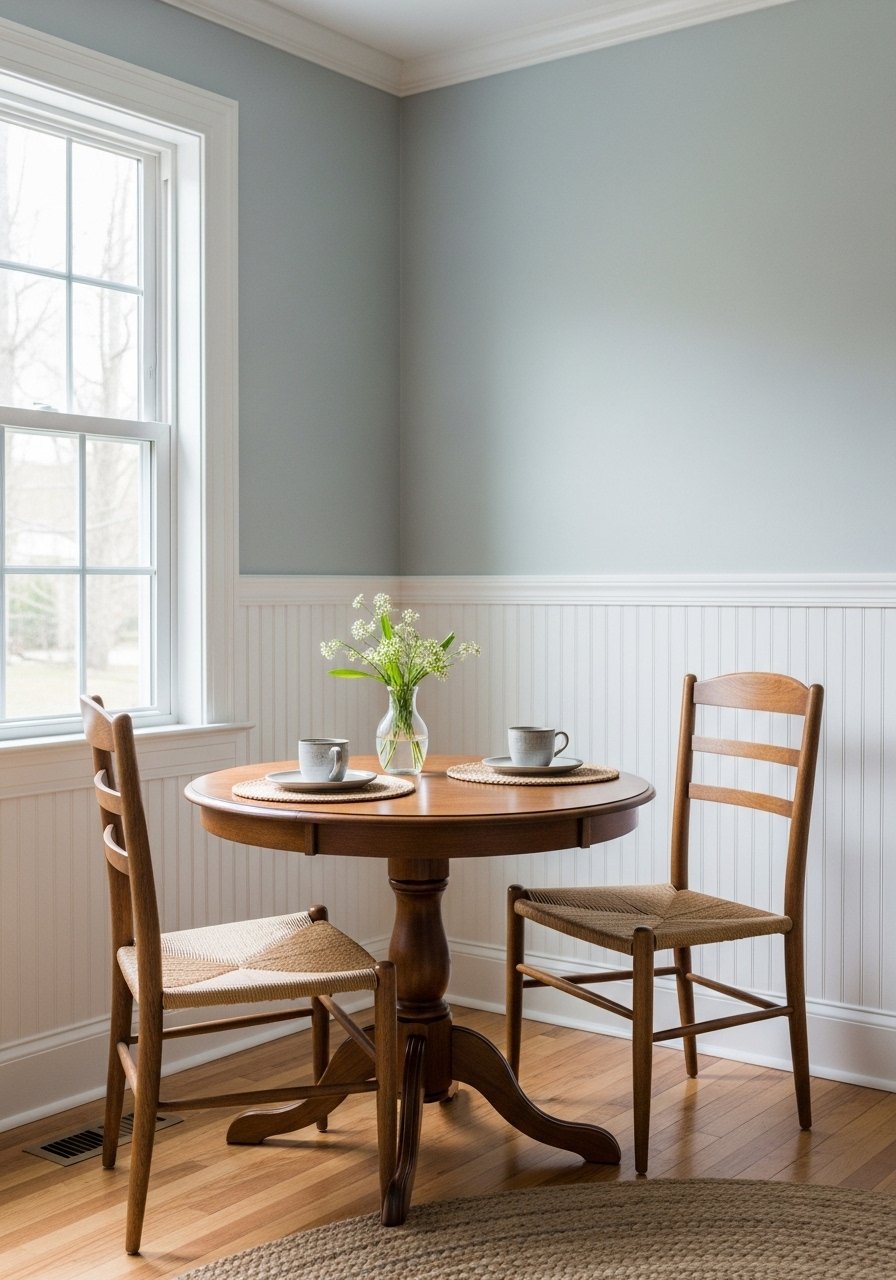
My living room had nice furniture and decent lighting but it still felt like a waiting room. Took me embarrassingly long to figure out it was missing texture, and a simple peel-and-stick plank wall fixed that without a contractor. Below are the actual projects I used when I wanted real-looking wood without the mess.
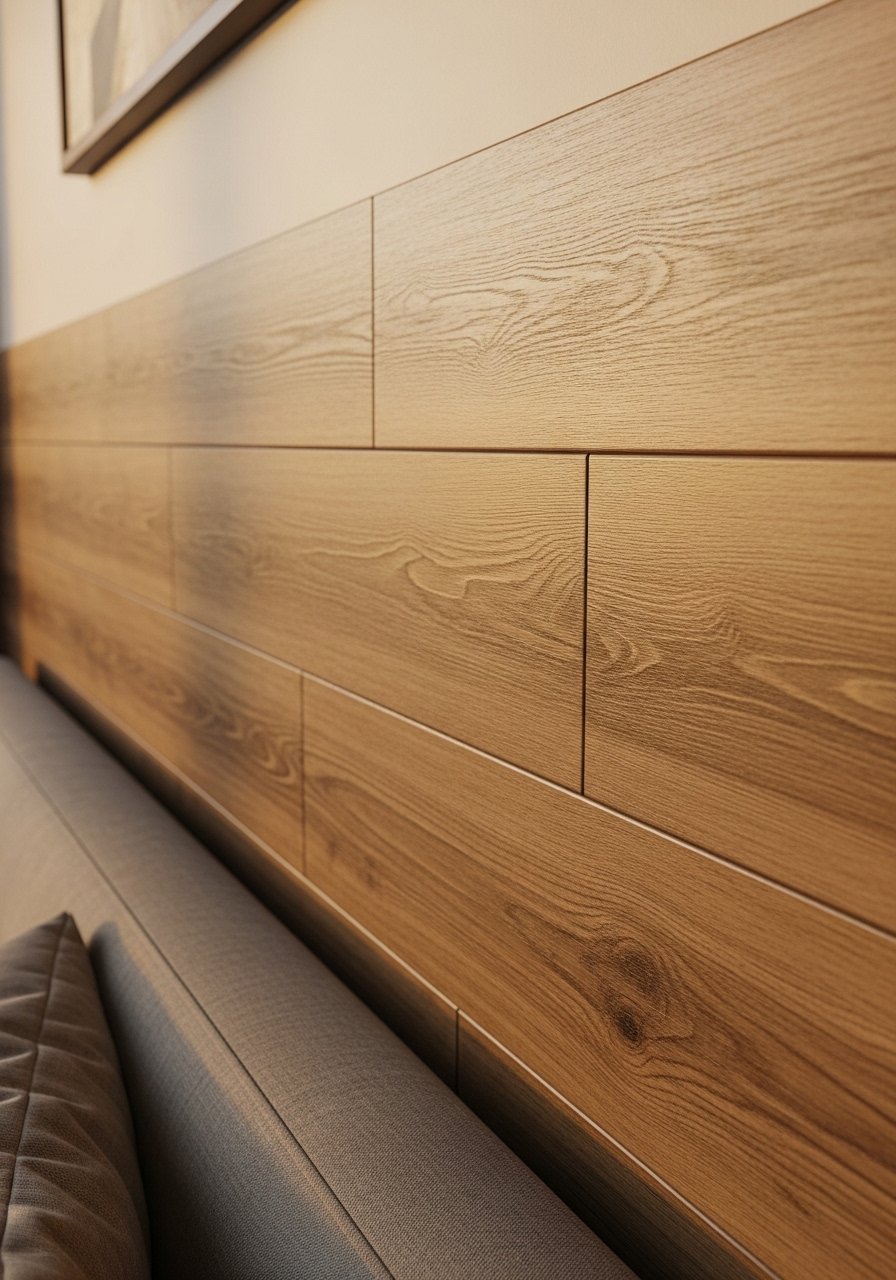
Realistic peel-and-stick planks work because they mimic grain depth and tiny shadow lines. I used 6-inch wide planks laid horizontally to make my 9-foot wall feel longer. Budget was under $120 for a 10-foot by 8-foot wall if you buy the right SKU. A common mistake is starting at the top. Begin at the floor so cut pieces end up hidden by the baseboard. I bought realistic peel-and-stick planks that had a 1/8-inch expansion gap recommendation. If you want a cozier look, stop after covering the middle third of the wall and pair with oversized art.
Layered Chevron Wood Accent for Bedroom
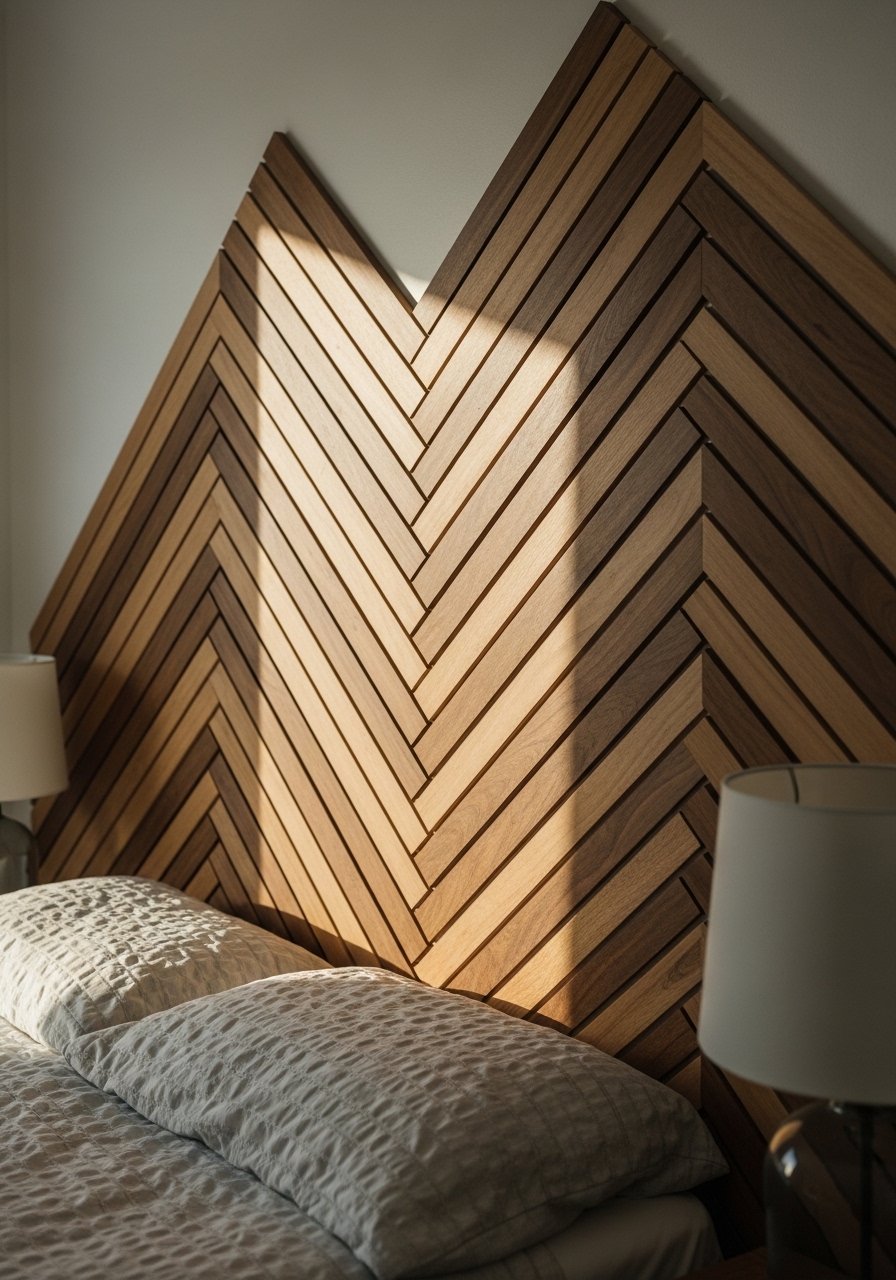
I tried the chevron pattern to avoid a full wall commitment, and it felt like putting jewelry on a plain dress. Cut 3-inch strips and use 2.5-inch spacing at the peak to keep the pattern tight without overwhelming the headboard. This works great in bedrooms where budget is $40 to $100 for a single panel. Don’t line up seams across rows, that makes the pattern look fake. Instead stagger them by at least 4 inches. I used thin peel-and-stick wood strips and capped the panel with narrow trim for a finished look. Pair it with the floating shelf idea below.
Floating Shelf Gallery in Modern Farmhouse Entry
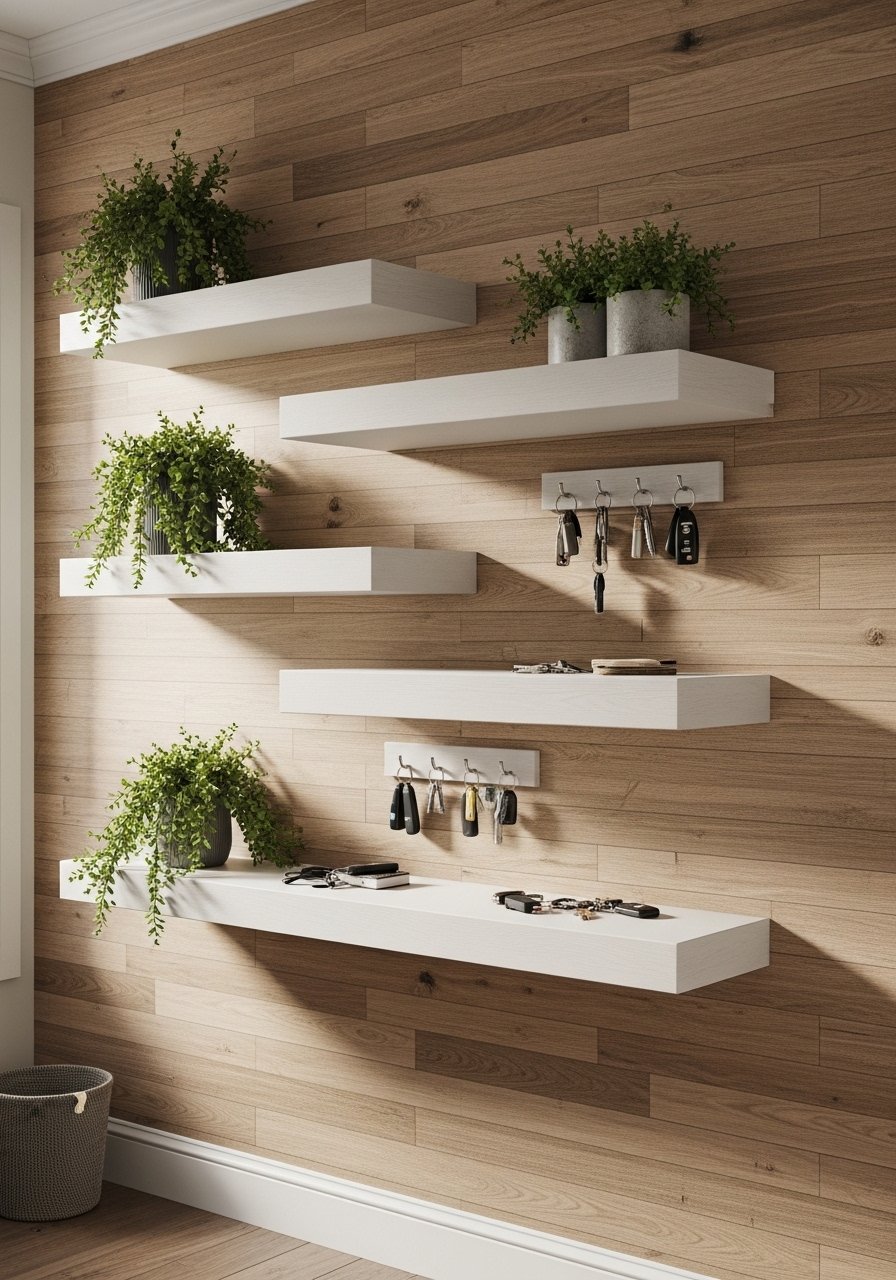
The entryway needed personality not more hooks. Adding three staggered white oak floating shelves over a plank backdrop gave the wall depth and a place to style seasonal items. Use the rule of three when arranging objects. Shelves 8 inches deep and spaced 12 inches apart usually look balanced. Budget runs $30 to $90 per shelf depending on length. A mistake people make is using narrow shelves that can’t hold decorative items. I bought white oak floating shelves and anchors rated for studs or drywall. This also hides smudges that appear on plain paint.
Reclaimed Distressed Finish for Dining Room
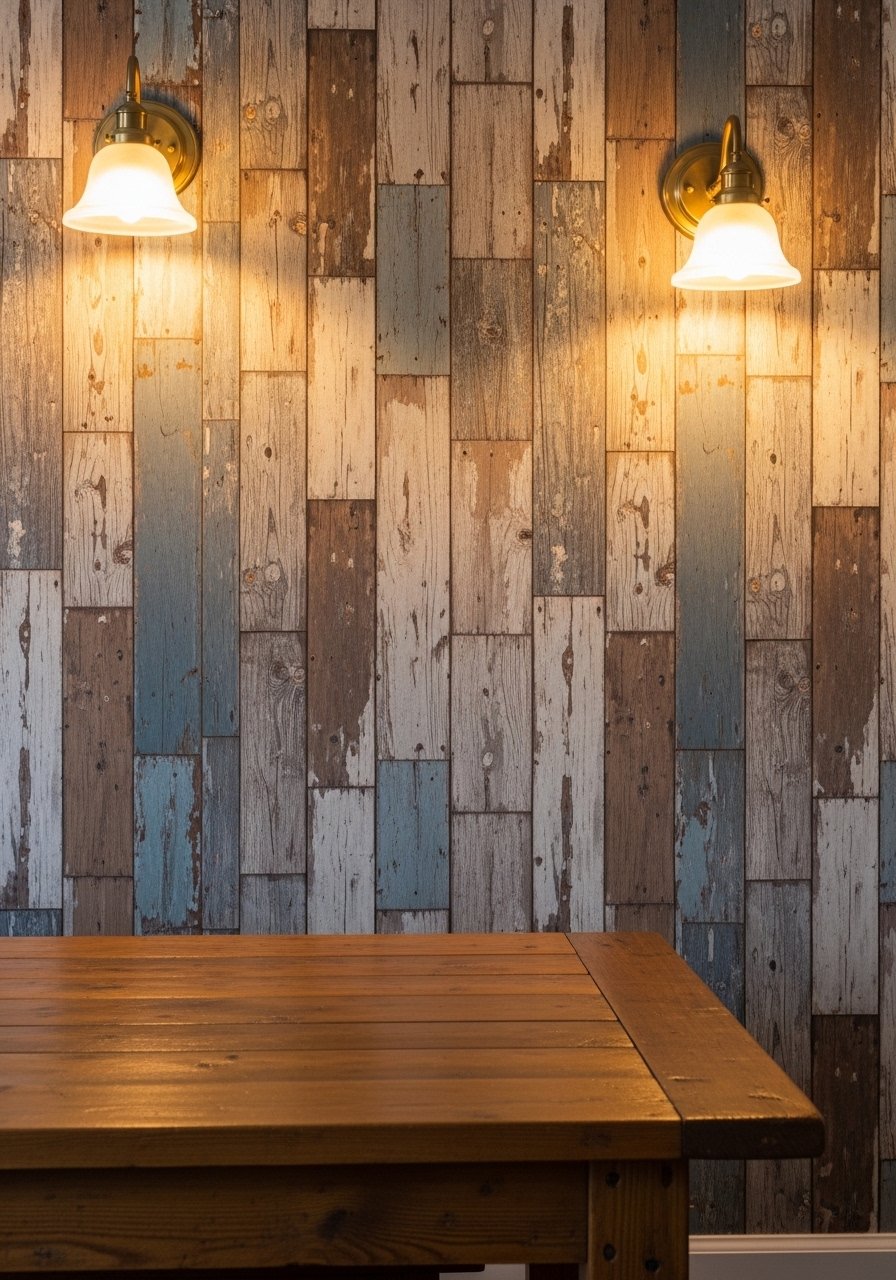
If you want a rustic vibe without salvaging barn wood, pick planks with intentional knots and darker edge distressing. I mixed two finishes at an 80/20 color ratio, 80 percent lighter tones and 20 percent darker planks for contrast. Plan for $100 to $200 depending on wall size. A common mistake is sanding the veneer thinking it will take stain. It usually will not. Instead buy pre-distressed options like distressed peel-and-stick planks. This pairs nicely with the farmhouse beam illusion idea later.
Minimalist Thin Slat Paneling for Hallways
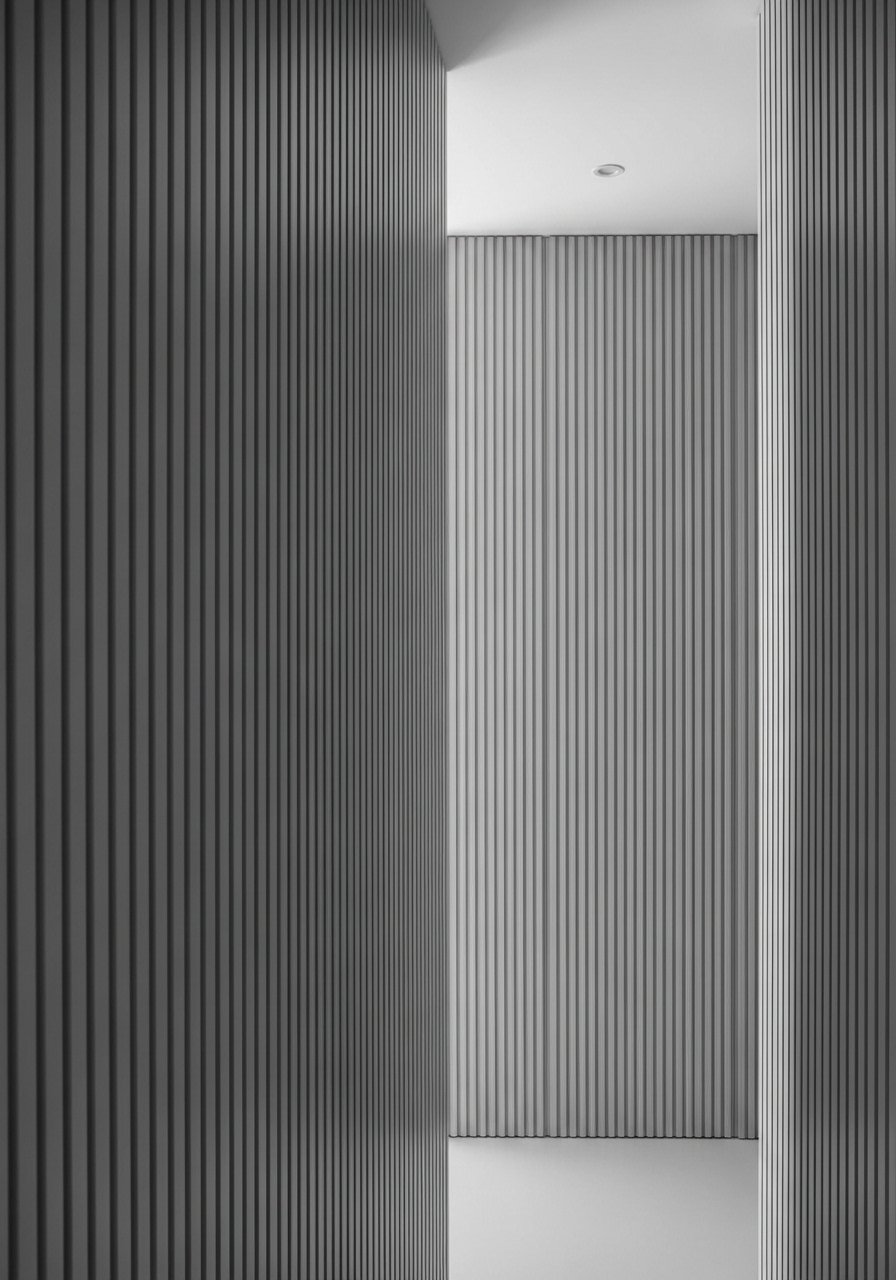
There was a stretch of hallway that felt boxy until I added thin 1.5-inch slats vertically. That simple texture makes ceilings feel higher. Keep slats 1.5 to 2 inches apart for the right rhythm. It costs under $60 for a 10-foot runner if you stick to thin strips. A mistake is painting them the exact wall color; instead use one shade darker for subtle depth. I used thin wood slat panels. This technique is renter-friendly because the adhesive comes off cleaner than full peel planks when removed carefully.
Round Wooden Disc Cluster for Nursery
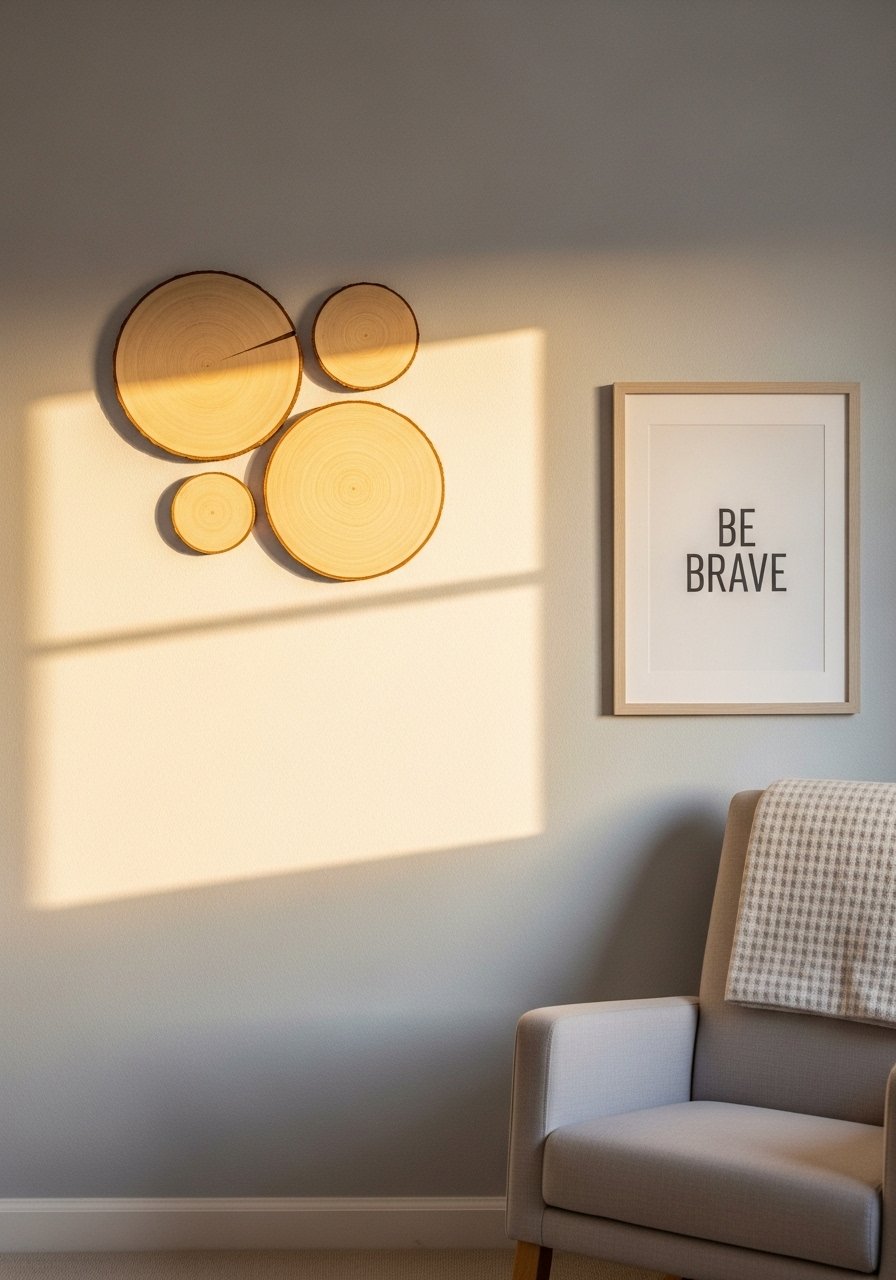
My sister wanted something playful for a nursery without sharp edges. I cut thin peel-and-stick veneer into discs, grouped them in odd numbers, and left 3 inches between pieces for air. Small discs are charming but eight or fewer keeps it from becoming busy. Budget is under $40 if you buy veneer sheets. A common mistake is centering the cluster on the crib. Offset it slightly toward the reading corner for better sightlines. I used peel-and-stick wood veneer sheets and mounted with double-sided tape for easy adjustment.
Diagonal Plank Headboard Wall in Master Bedroom
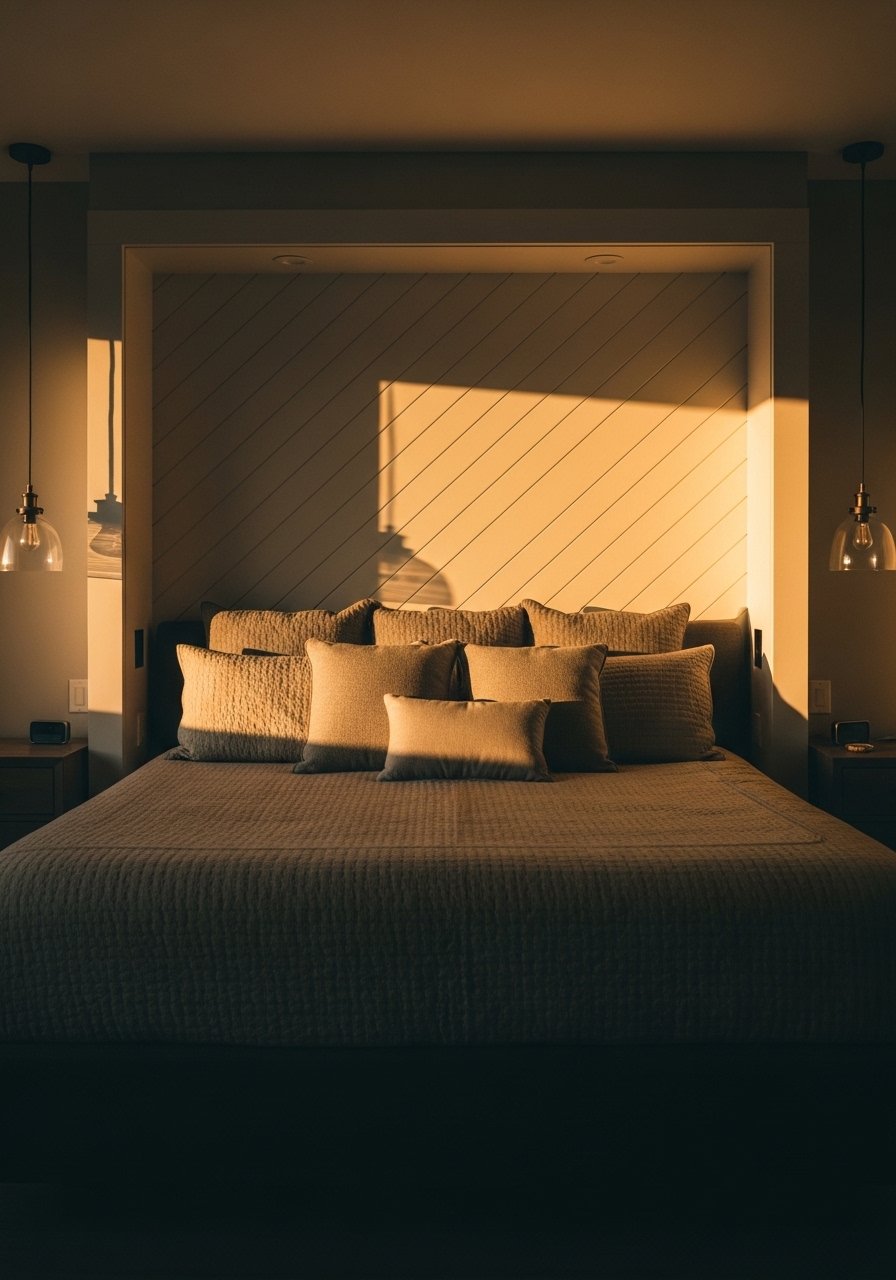
My bed looked small until I installed diagonally cut planks that form a giant headboard. Diagonal lines pull the eye upward. Cut planks on a 45-degree angle and leave a 1/8-inch gap at the top for expansion. This is a $70 to $150 weekend project. Mistake people make is skipping measurements for the mattress width. Extend the feature 6 inches past the bed on each side to avoid awkward edges. I used peel-and-stick diagonal planks. Combine it with layered pillows for a hotel feel.
Mixed Real and Faux Wood Around Kitchen Stove
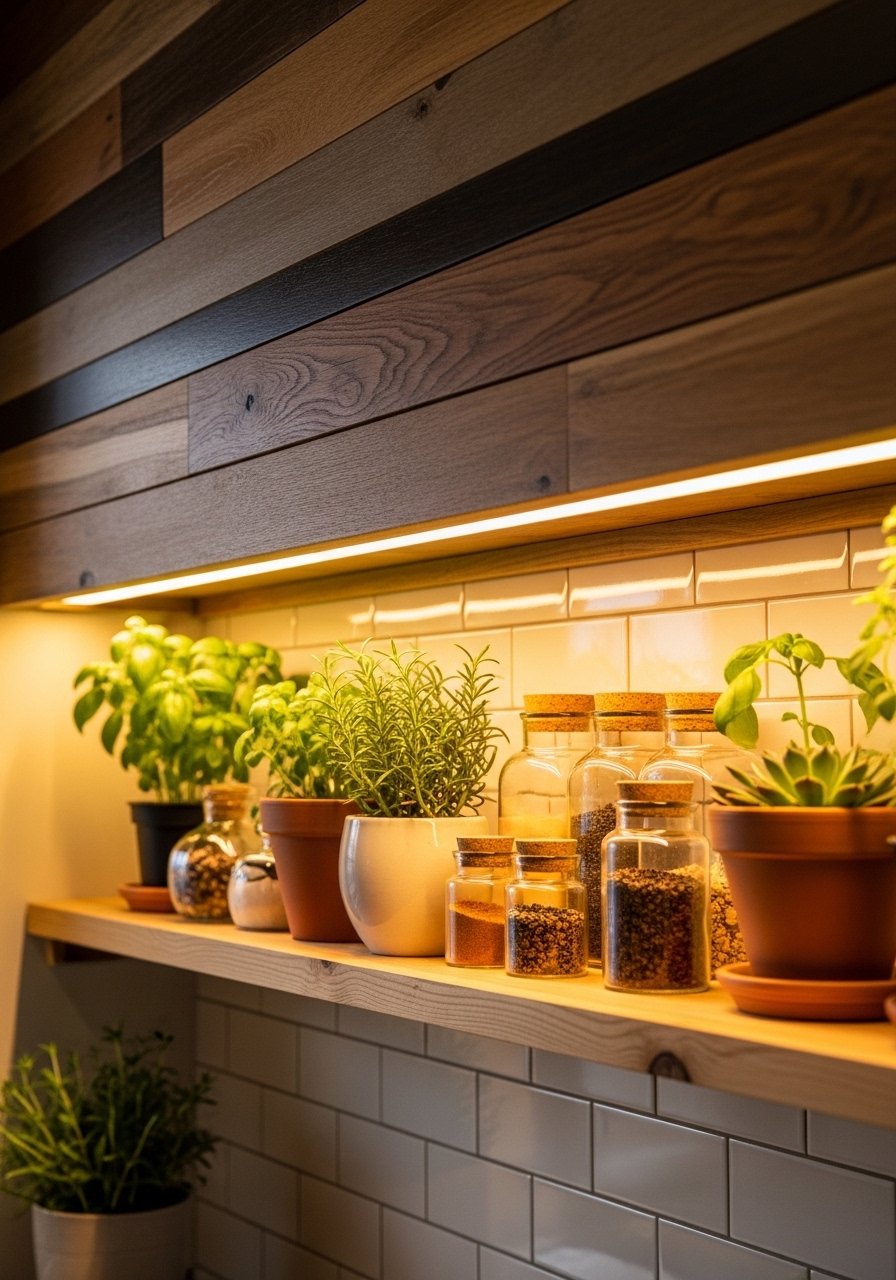
Real wood plus peel-and-stick creates believable depth because real grain anchors the look. I installed a small real oak rail below a peel-and-stick panel above the stove to hide a vent. Budget depends on real wood choice, expect $50 to $200. A mistake is using peel-and-stick behind heat sources without checking heat ratings. Use heat-resistant products and test a small area. I used peel-and-stick wood tiles and a separate sealed oak rail to balance authenticity. This is a fresh angle most tutorials skip.
Rental-Friendly Faux Wainscoting for Dining Nook
Renters ask me how to add architectural interest without permanent changes. Faux wainscoting that reaches 36 inches high looks classic and removes with heat and patience. Cut panels to fit between baseboard and chair rail height. Budget is under $80 for a small nook. The mistake is installing full-height panels which feel heavy in small spaces. I bought peel-and-stick wainscoting panels and painted them a shade darker than the wall for contrast. Pair this with the floating shelf gallery idea.
Framed Faux Shiplap for Cozy Reading Nook
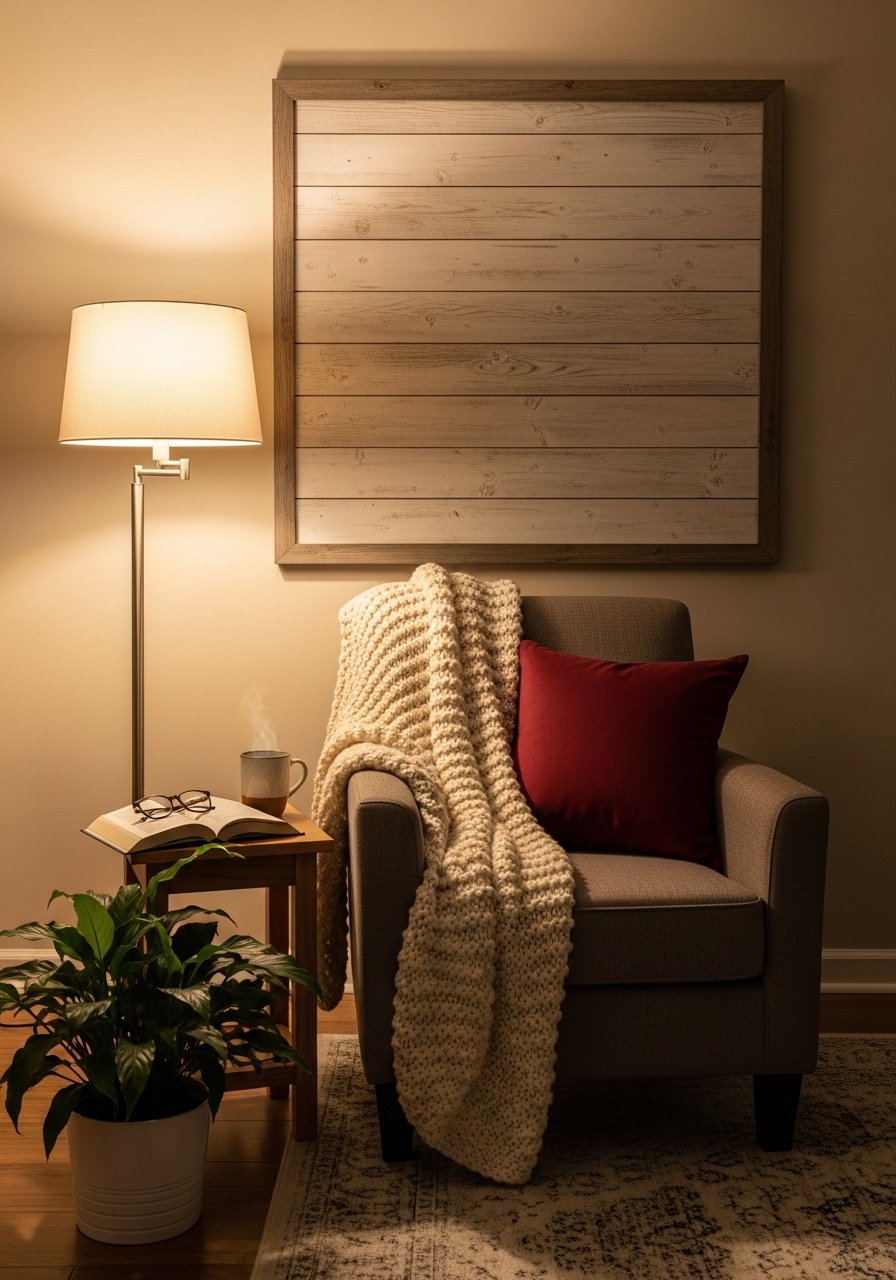
Shiplap can look too coastal if slapped across a whole room. Instead frame a single shiplap panel behind a reading chair to create a cozy backdrop. Use 4-inch boards with a visible 1/4-inch channel between boards. I budgeted $30 for a single framed panel. A common mistake is lining up the framed panel with the edge of furniture. Leave a 2-inch margin. I used peel-and-stick shiplap planks. This idea works well with the 80/20 color ratio—keep 80 percent neutral and 20 percent a warm accent.
Half-Wall Wood Tile Backdrop for Home Office
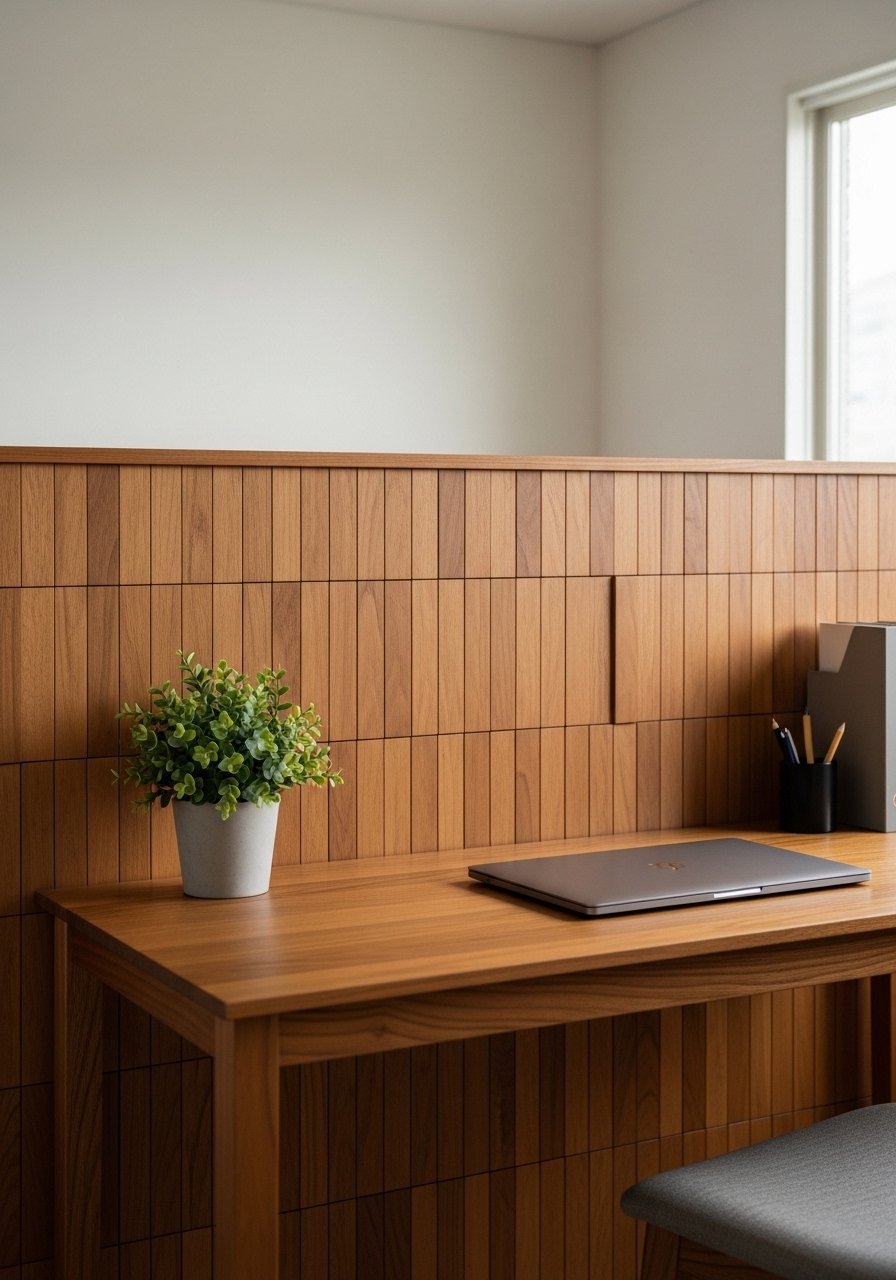
Zoom backgrounds matter. I installed wood tile backsplash across the lower half of my office wall so video calls look intentional. Use tile height at desk level, roughly 40 to 48 inches from the floor. Budget $50 to $120. Mistakes include going full wall, which can be distracting on camera. I grabbed peel-and-stick wood tiles that read as real from five feet. This also hides scuffs from chairs and provides a tactile surface for floating shelves.
Staggered Plank Mural for Playroom
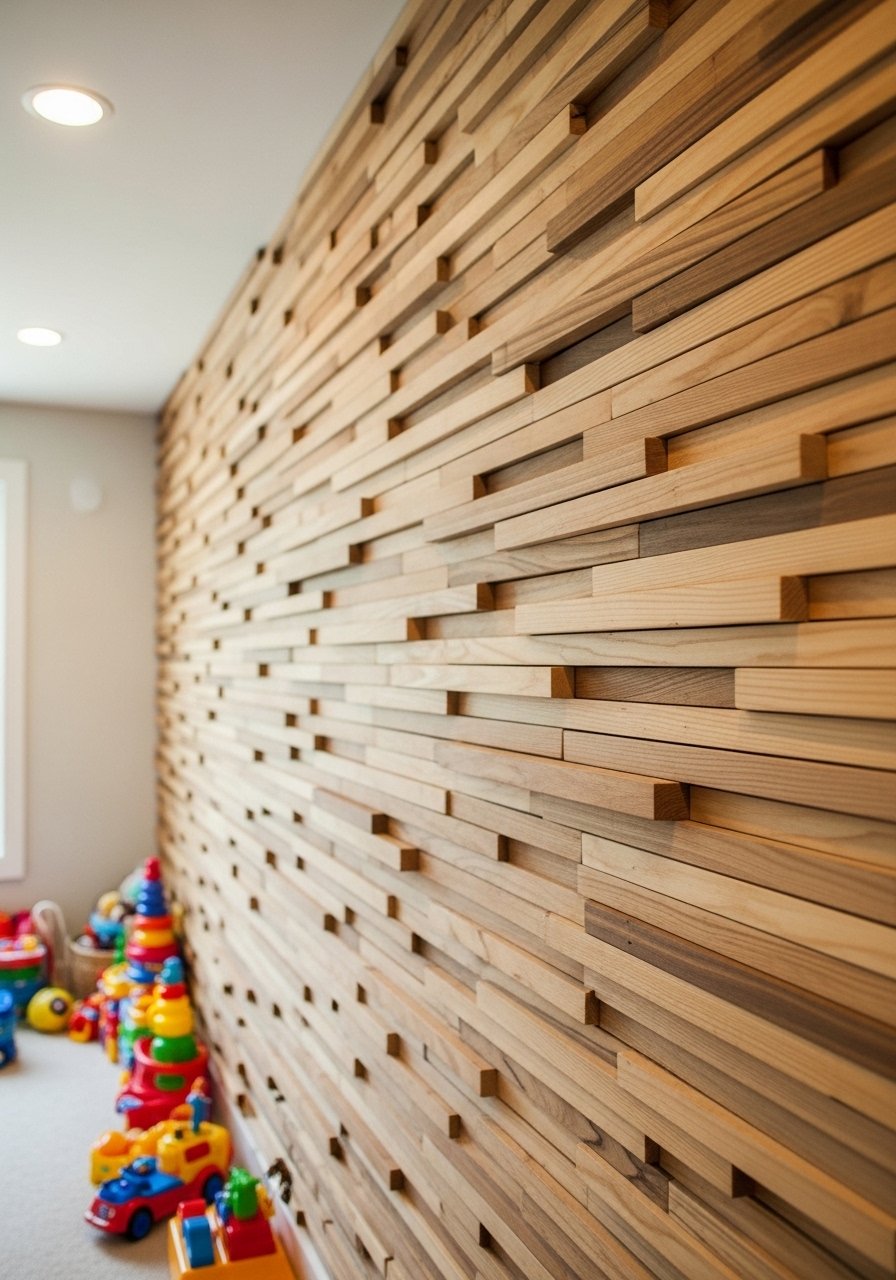
Kids need walls that can handle scribbles and stickers. A staggered plank mural with random-length pieces creates energy without being chaotic. I used three plank lengths, repeating them in a loose rhythm that repeats every 24 inches. This keeps the eye moving. Budget under $100. Common mistake is repeating the same length pattern too predictably. I used peel-and-stick mixed-length planks. Add a washable top coat if you want to make cleaning easier.
Floating Wood Art Hexagons for Small Corners
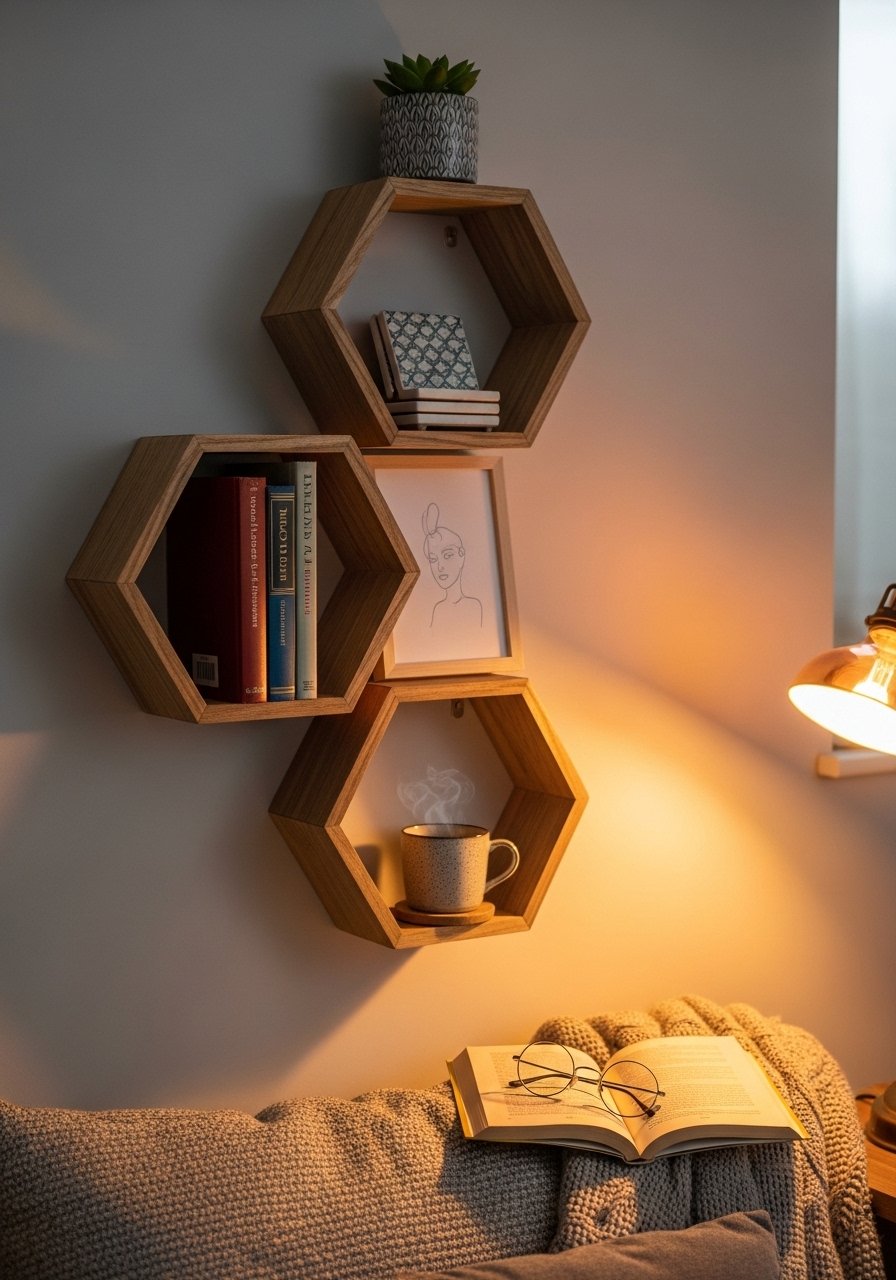
I wanted interest in a tiny corner without a full wall project. Three hexagon panels of different woods arranged vertically created a sculptural effect. Keep the largest hexagon about 12 inches across and the smallest at 6 inches to follow the rule of three. Cost under $30. Mistake people make is spacing them too close. Leave 4 to 6 inches between shapes so each one reads. I used wood hexagon panels. These are great paired with the round disc cluster idea earlier.
Vertical Tongue-and-Groove Look in Bathroom
Bathrooms are tricky but vertical tongue-and-groove in a moisture-rated vinyl look can add structure without rotten wood concerns. Use thinner panels with a water-resistant backing and leave a 1/8-inch gap at the top near the ceiling. Expect $60 to $150 depending on waterproof rating. A common mistake is using interior-only veneers in a humid space. I chose water-resistant peel-and-stick panels. Pair this with brass hardware for contrast.
Layered Trim with Peel-and-Stick for Budget Chic Entry
One of my favorite budget tricks is pairing thin peel panels with layered trim to mimic custom millwork. Frame a 24-inch panel with 1.5-inch trim pieces and paint the trim a shade lighter. The trim hides imperfect plank cuts. It cost around $50 for materials. A mistake is using thick trim that feels heavy. I used peel-and-stick wood panels and narrow trim pieces. This is a good companion to the faux wainscoting idea if you want consistency.
Oversized Wooden Clock Wall Using Peel Veneer
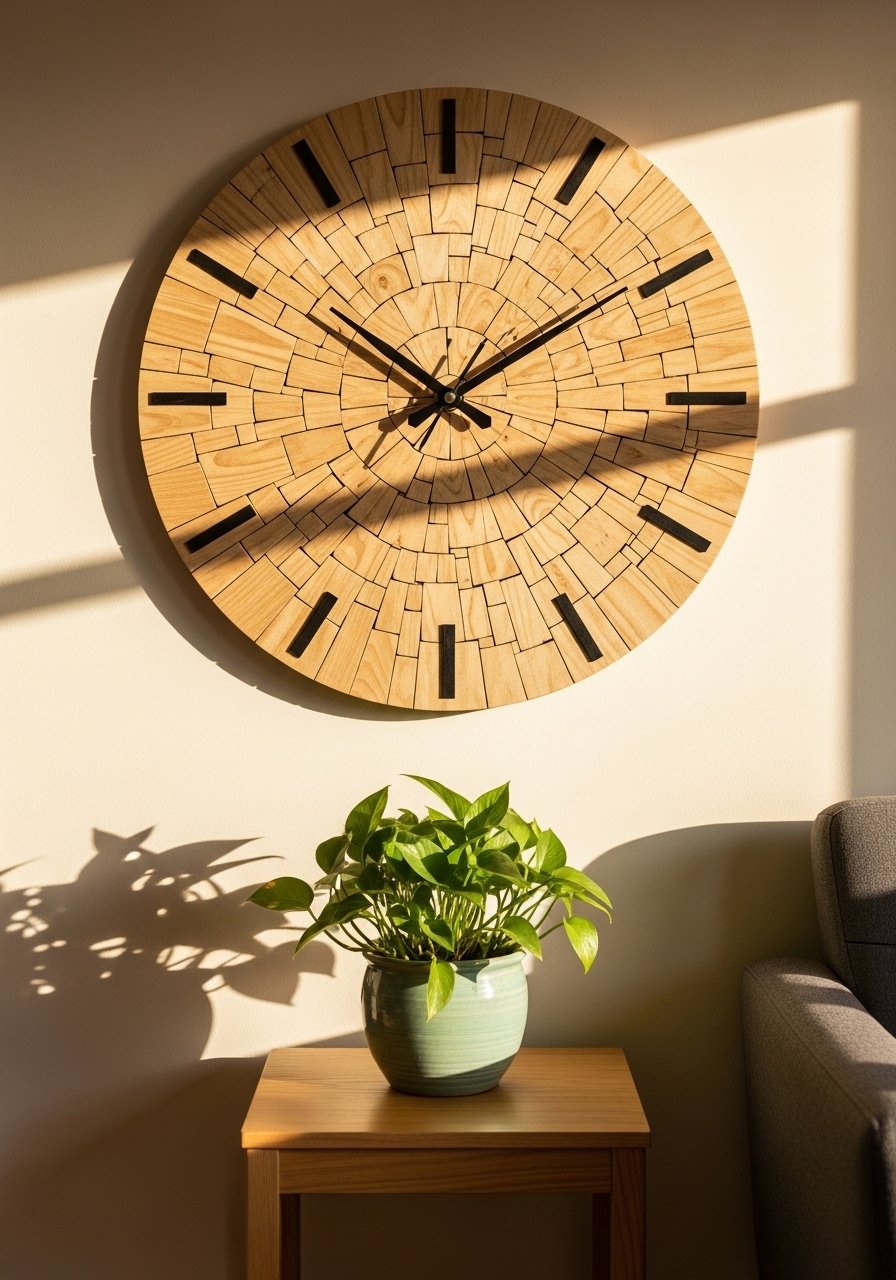
I tried making a statement piece without buying art. A round veneer base with large numerals created an oversized clock that reads as custom wood. Use a 30-inch base for real presence and mount with a french cleat. Budget $25 to $75 plus clock hardware. Mistake people make is using lightweight adhesives only. I used wood veneer sheets over a plywood circle for stability. This is a fresh angle many tutorials skip.
Farmhouse Beam Illusion Above Fireplace
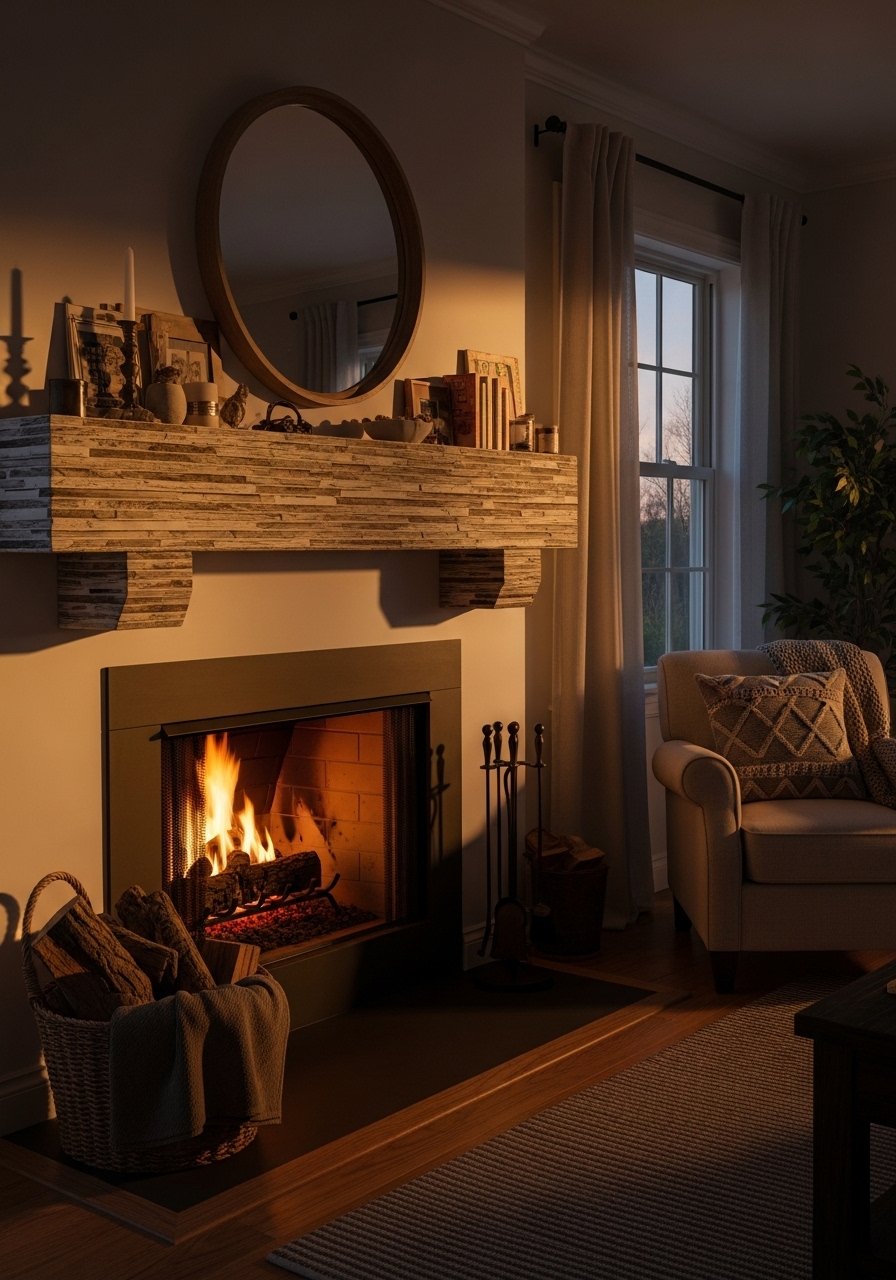
Real beams are heavy and pricey. I built a faux beam using peel-and-stick planks wrapped over a hollow substrate for the look without the weight. Keep the beam depth at 6 to 8 inches so it reads as substantial. Expect $60 to $200 depending on length. A common mistake is making it too shallow and having it look like trim. I used peel-and-stick wood veneer wrapped around a box frame. This pairs well with the distressed finish idea for continuity.
Geometric Inlay with Light and Dark Peel Strips
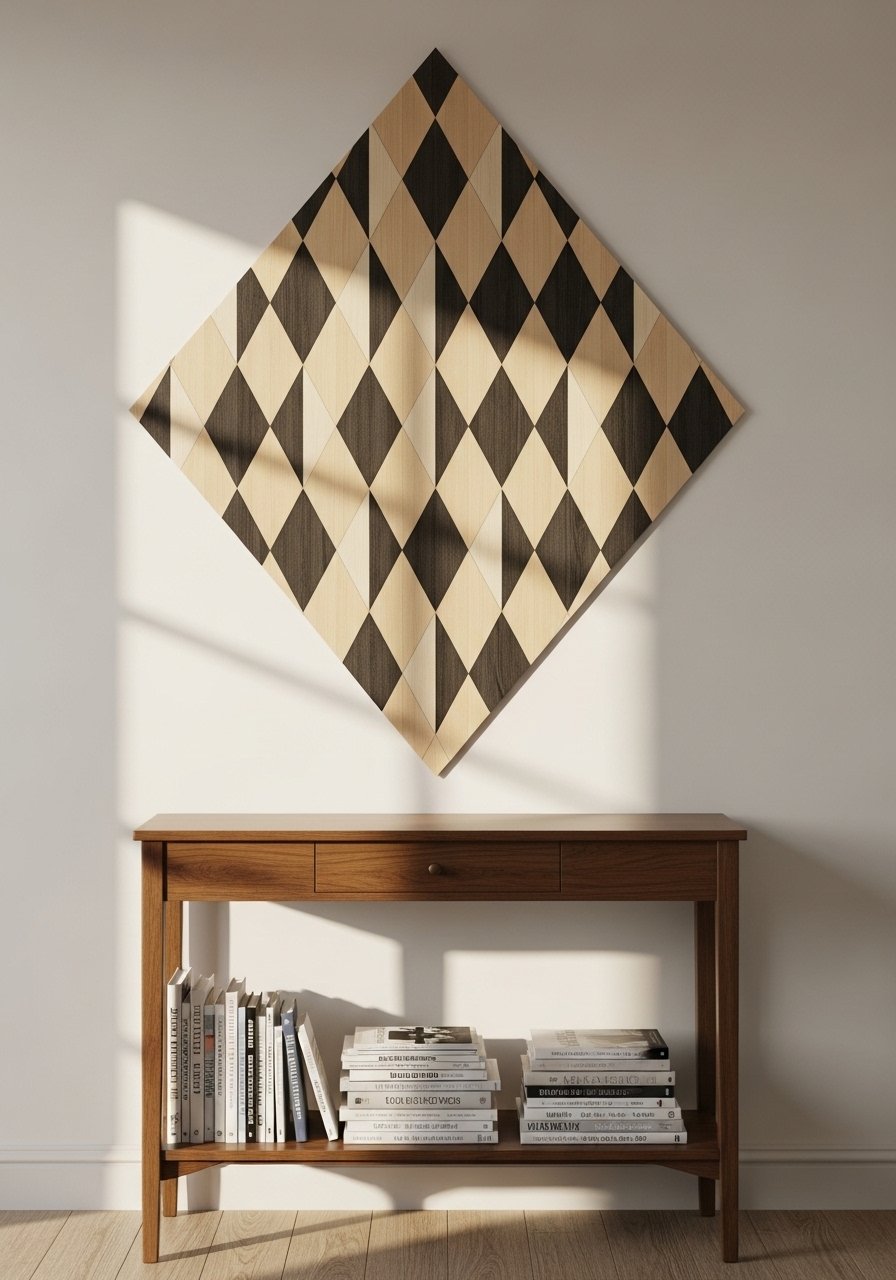
I love a subtle pattern. Laying light strips next to darker ones in a diamond repeat makes a modern geometric inlay that reads as expensive. Use a 2:1 ratio of light to dark strips so the design feels airy. This project cost $40 to $90 for a medium wall. A mistake is using equal amounts of both tones which can look heavy. I picked light and dark peel strips. This is an angle many others miss because it looks labor intensive but is actually straightforward.
TV Accent Panel to Hide Cables in Living Room

My TV wall improved overnight after adding a single vertical wood panel to cover cables and add warmth. Make the panel 6 to 8 inches wider than the TV on each side for balance. Expect $40 to $120. Mistake people make is centering the panel on the room instead of the TV, which throws off sightlines. I used peel-and-stick wood sheets and ran cables behind the panel. This pairs with the floating shelf gallery idea for hiding remotes and consoles.
Peel-and-Stick Wood Art with Soft LED Backlight
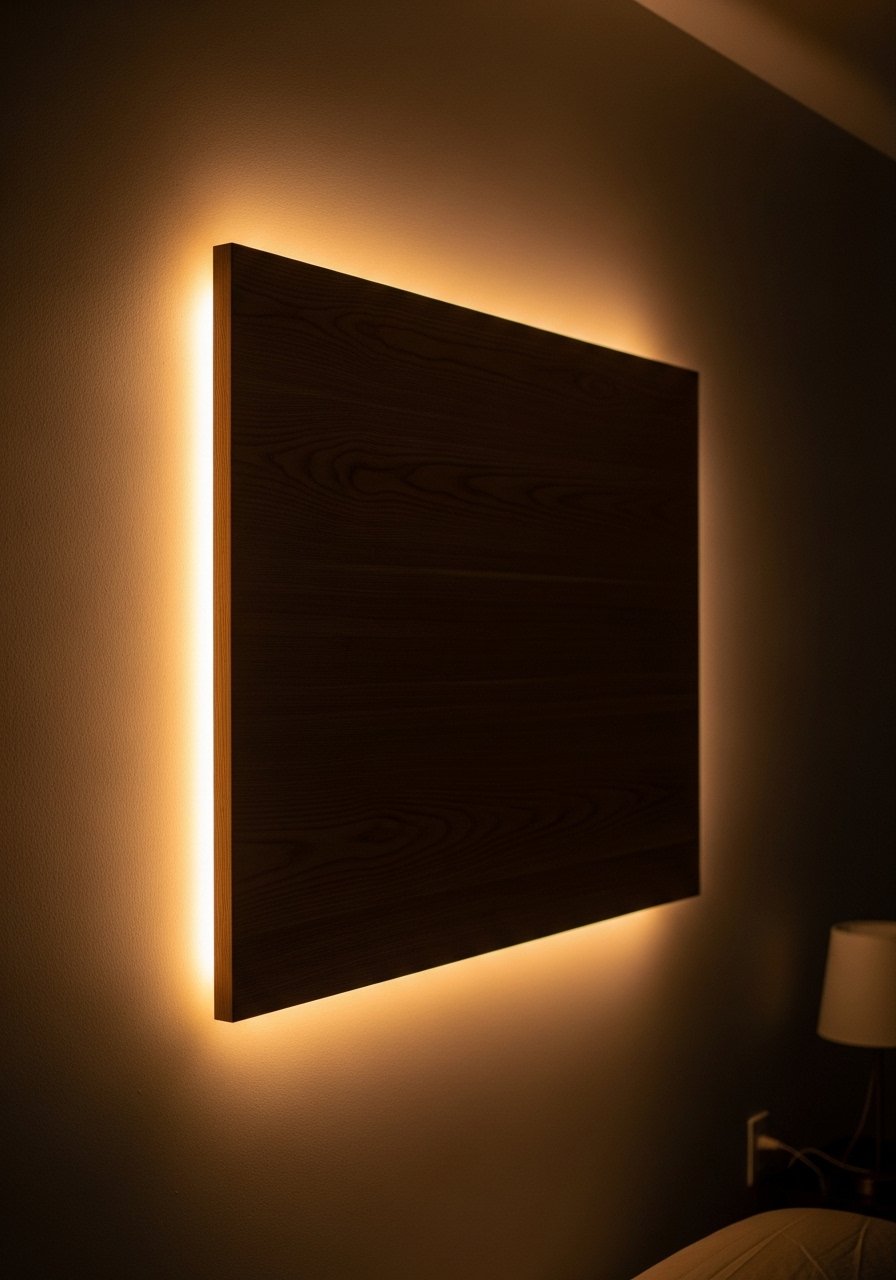
If you want drama for almost nothing, mount a thin peel-and-stick wood panel and add LED strips behind it for a halo effect. Use neutral wood tones and warm 2700K LED strips. Budget $30 to $70. A mistake is using cool white LEDs which read hospital-like. I used warm LED strip lights and a 24×36 panel from peel veneer. This is a renter-friendly way to get built-in lighting without rewiring.
Your Decor Shopping List
Textiles
- Honestly the best $40 I spent, chunky knit throw in cream 50×60 inches, drape over a sofa arm for instant warmth
- 22-inch down-filled linen pillow covers in warm gray and ivory, swap colors seasonally
Wall Decor
- Realistic peel-and-stick planks 6-inch width, choose the beveled edge for shadow lines
- Peel-and-stick shiplap planks for framed panels in reading nooks
Shelving and Hardware
- White oak floating shelves 36 inches, anchors included
- Brass picture ledges for easy rotating art
Lighting and Plants
- Warm LED strip lights 2700K for backlighting art
- 6-foot faux fiddle leaf fig for low-maintenance height
Budget Finds
- Peel-and-stick wood veneer sheets for small DIY shapes
- Peel-and-stick wood tiles mixed lengths affordable sample packs, Target and HomeGoods often carry similar options
Shopping Tips
- White oak beats dark wood in 2026. Design feeds have shifted completely. These white oak floating shelves look current, not dated.
- Grab realistic peel-and-stick planks for full walls. Measure twice and buy 10 percent extra to account for angled cuts.
- Curtains should puddle or kiss the floor, never hang halfway up. These 96-inch linen panels are right for standard 9-foot ceilings.
- Use warm 2700K LEDs behind art. Warm LED strip lights 2700K avoid that cold glow and make wood read richer.
- For renters, test a 1-foot square before committing. Peel-and-stick wood veneer sheets are inexpensive for tests and remove more cleanly than large panels.
- One bold plant wins over five small succulents. Try a 6-foot faux fiddle leaf fig if you need height with zero upkeep.
Frequently Asked Questions
Q: Can peel-and-stick wood look real up close?
A: Yes, good vinyl planks have printed grain and slight beveling that cast micro shadows. Sit and inspect at arm's length before you buy. For full authenticity, mix in a small real wood shelf or rail.
Q: Will peel-and-stick damage walls when removed?
A: Most modern products peel off cleanly if removed slowly and warmed with a hair dryer. Test a 6-inch square first. Avoid super-strong construction adhesives if you rent.
Q: What measurements make a feature wall look balanced?
A: For living rooms, stop the accent at one third to two thirds of the wall width to avoid dominating the room. For headboards, extend 6 inches beyond the bed on each side. These small rules keep features intentional.
Q: Can I use peel-and-stick in humid rooms like bathrooms?
A: Only use water-resistant rated panels. Even then keep them above splash height and leave recommended expansion gaps. I used water-resistant peel-and-stick panels in a bathroom with no issues.
Q: How do I hide seams so the wall reads as real wood?
A: Stagger seams and vary plank lengths. Leaving 1/8-inch expansion gaps and choosing beveled edges helps create the shadow lines that sell the look.
Q: Is mixing faux and real wood a good idea?
A: Absolutely. Mixing a real oak shelf with peel-and-stick background creates depth and convinces the eye the whole wall is real. It is one of the simplest authenticity tricks.
Q: What are common mistakes first-timers make?
A: Starting at the top, failing to buy extra material for waste, and centering small panels awkwardly. Measure for furniture sightlines and always cut after dry-fitting.
Q: How do I choose finish contrast for a modern look?
A: Use an 80/20 color ratio, 80 percent lighter tones and 20 percent darker accents. That keeps the wall feeling airy while still providing contrast.
